Introduction
Modern GPUs, just like CPUs, are programmable. This means that you can write your own programs that can be executed on a GPU. Those programs are called shaders. Shaders can be written in a specific, very simple language. For DirectX that language is called HLSL, which stands for High Level Shading Language. Shaders, just like programs in C++, need to be compiled for the GPU to understand its instructions.
In this chapter we will create our first shaders and we will create an infrastructure for easy compilation and usage of those shaders. We will also take a quick look at the compiled shaders by the end. Additionally, we will learn basics about HLSL, a language used to write shaders.
Architecture
We have added two new classes to the entire architecture, as well as we added one more level of abstraction to the Output File class. Additionally, we will add a class for reading the files. The most important changes to the architecture are visible on the figure x.
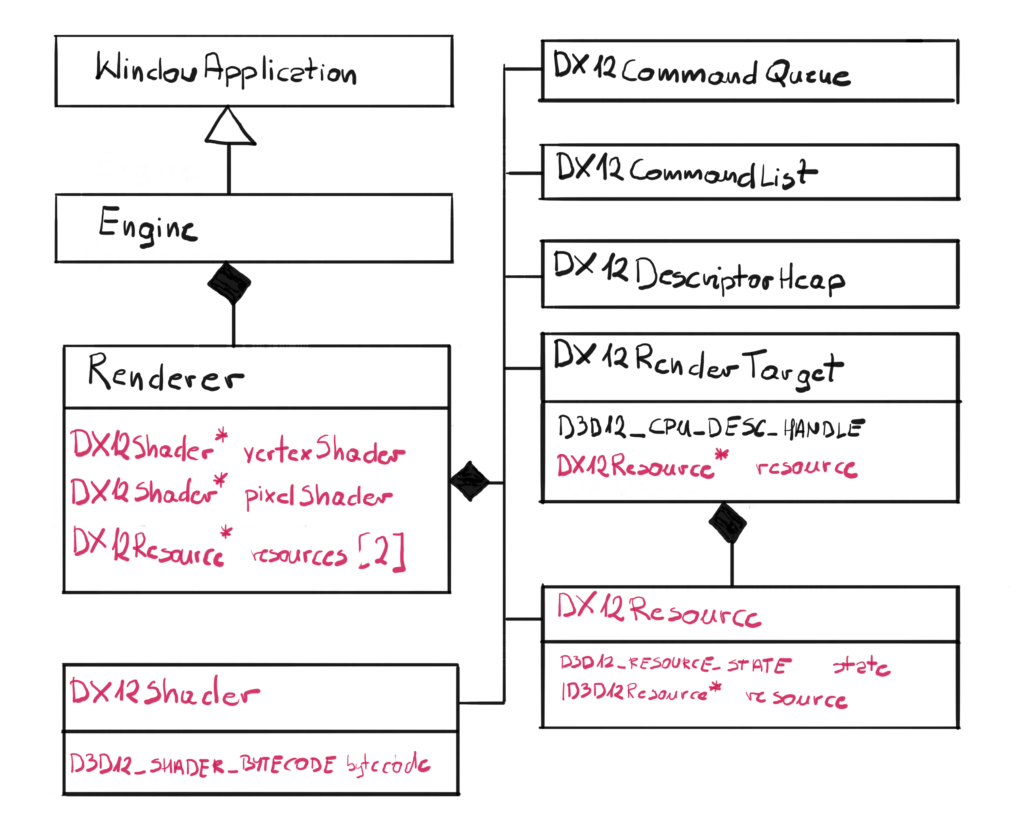
Starting from the biggest class – the Render is getting three new members: two shaders and an array of two resources. I decided to create one more layer of abstraction, since I didn’t want Render Target to wrap around the raw Resource pointer. On top of that, we obviously have two new classes. DX12Shader will simply read in the compiled shader data and store it for later. The DX12Resource will be responsible for either creating or getting external resource and keeping the state information within. The pointer to the underlying Resource has also been added to the DX12RenderTarget class.
There is one more change that didn’t make it to the chart. I have added a new InputFile class, which is responsible for reading the data from a file. And since now we have this common functionality between OutputFile and InputFile, I have extracted this to a separate class.
Shader Creation
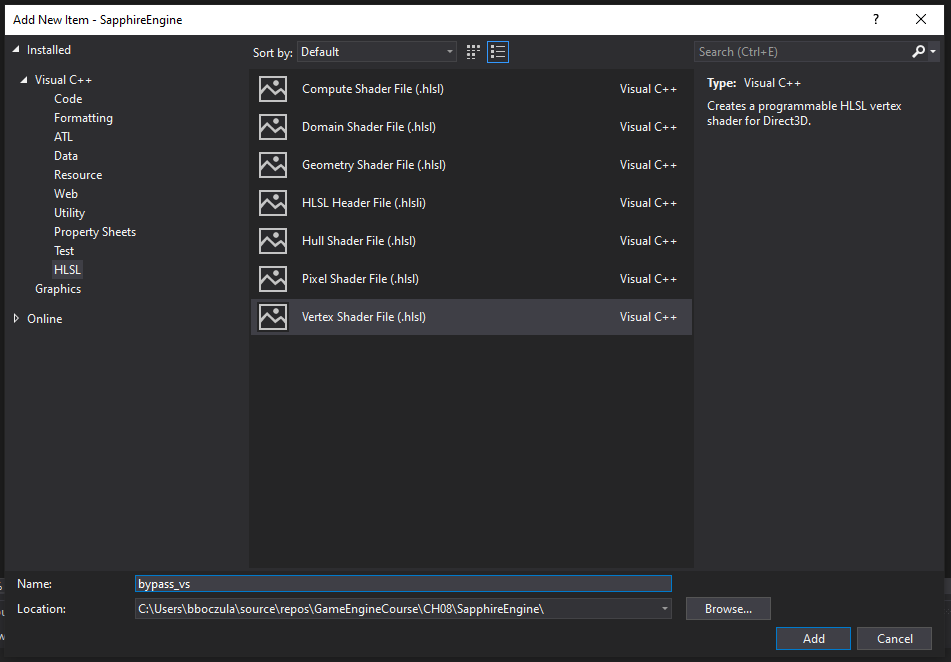
Let’s create a new shader file. To do so, in Solution Explorer you have to right-click the folder you want to store your new file in, then select Add -> New Item…

Then, from the tree on the left, click the “HLSL” category. From the middle section, pick “Vertex Shader file”. Next, you have to type the new file name. Since our shader will do nothing except bypassing values to the Pixel Shader, let’s call it “bypass_vs”. Finally, click “Add” and there you go, a shiny new pixel shader. And it already has some basic HLSL code in it, which is great.
Just to be sure, righ-click on the new shader, click “Properties”, then click “HLSL Compiler”, then “General” and make sure that the Shader Model is set to 6.0. Then do the same procedure, but this time for Pixel Shader.
Shader Code
Even though HLSL is a very simple language when compared to let’s say C++, it is still a language and to it takes a lot of time to learn it. But since we have just created our two very first shaders, we have to take at leas a short look at them. Let’s start with the Vertex Shader.
float4 main( float4 pos : POSITION ) : SV_POSITION
{
  return pos;
}
At the first glance, this syntax might look familiar. This is a function that generally takes a flaot4 as the input parameter and it also returns a float4. The function itself does nothing really – whatever value was passed, is going to be returned. Since this is a Vertex Shader, it will be run once for every vertex, and every vertex has a position in a 3D space. There are some additional things, like words after the semicolon. Those are called semantics. A semantic is a string attached to a shader input or output that conveys information about the intended use of a parameter. Semantics are required on all variables passed between shader stages. Let’s leave this like that for a moment, everything will become more clear in the next chapter, where we will cover the GPU pipeline.
The pixel shader is being run for each pixel that is covered by the input geometry. You can imagine the situation where you have a triangle that covers a significant portion of the screen. Since triangle has only three vertices, Vertex Shader will be run only three times. But since the triangle is big enough, it could potentially spawn hundreds of Pixel Shaders, each processing a single pixel at the time.
float4 main() : SV_TARGET
{
  return float4(1.0f, 1.0f, 1.0f, 1.0f);
}
The Pixel Shader code looks similar to Vertex Shader, but this time there are no input parameters. Additionally, the semantics is different. The function returns a flaot4 which in this case represent the final color of the pixel. Now as you can imagine, this shader will always return the same color which is white. The final output of those two shaders will be a bunch of white pixels that were covered by the input geometry.
Normally, in the professional engines, Pixel Shaders can get really complicated. They can sample textures to give more details to the geometry, they add the lights to the scene. They also not necessarily run on the geometry – they can run for each pixel in the entire screen, which is generally refereed to as a fullscreen pass. Don’t worry, we will have a plenty of time to develop our HLSL skill. This is just a beginning of the journey.
Shader Compilation
Believe it or not, modern games use hundreds if not thousands shaders throughout the game. Some of those shaders are just a variation of the same shader, based on some defines, but still – all of those shaders have to be compiled.
Initially I wanted to create a separate class for the shader compiler, but in the end I decided not to. Instead, we will use the functionality that is available for us in Visual Studio. Turns out, that if you setup your project properly, Visual Studio can compile the shader for us. What we need to do is to simply read the file with compiled shader and provide it to Pipeline State.
You should now be able to compile the Engine project, but this time it will automatically include the shader compilation. There is however one more thing we have to do. The output of the shader compilation of a single shader is the CSO file. This file is by default being put into the Target Directory which is generally good. However, we have two projects in our solution – one for engine and one for the reference checking. The latter is used to see how the engine is going to be used by the end user. Since the reference is the startup project, we have to copy the CSO file to the Target Directory of that project.
We will do that by adding additional command line that will be executed after the build is triggered. To do that, right-click on the SapphireEngine project in Visual Studio, then pick Properties. In the project’s Property Pages, in the left panel select Build Events and then Post-Build event.
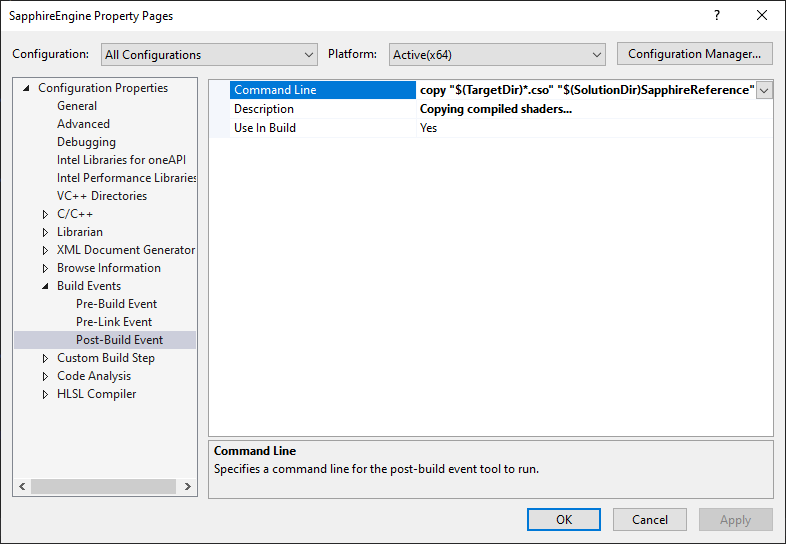
Now it is time to put the actual command line to be executed. We will put this in the Command Line section. You can type it directly in this window, or you can click on the small arrow on the right and click Edit. The new window will pop up and you will be able to see more information, so I recommend that method.
At this point of the compilation, we can safely assume that the compiled shader files are present in the target directory. However, what we really want is we want those file in the SapphireReference project directory. That will leave us with the following command line.
copy "$(TargetDir)*.cso" "$(SolutionDir)SapphireReference"
There are two variables that we are using here, the TargetDir, which resolves to the folder where executable is, and the SolutionDir, which is the folder that contains both of our projects. We now simply use the copy command to copy all CSO files to the SapphireReference directory, which will allow us to successfully run the executable without necessity to leave Visual Studio environment.
The only downside is – the CSO files won’t get copied if the build is not fired. So if you for example delete the CSO files outside of Visual Studio and then try to run the engine from within the Visual Studio, files won’t get copied and you will get an error. In that case, you have to rebuild the solution and that is it.
Shader Class
Let’s take a quick look at the interface of the shader wrapper class.
class DX12Shader
{
public:
  DX12Shader(LPCSTR fileName);
  ~DX12Shader();
  D3D12_SHADER_BYTECODE GetBytecode();
private:
  D3D12_SHADER_BYTECODE bytecode;
};
The class design is very simple. That is because we have decided to leave the shader compilation to Visual Studio. If we were about to compile shaders ourselves, then we would have to implement the whole compilation process and we would have to store more data and do more computation. And now, what we actually have to do is we have to read the CSO file in and cast it to a shader bytecode. This is the data that we have to deliver to the Pipeline State Object that we will cover just a little later.
Constructor
Entire initialization of the shader takes place in the constructor. All we have to do by that time is we have to read and store the compiled shader data.
DX12Shader::DX12Shader(LPCSTR fileName)
  : bytecode({ nullptr, 0 })
{
  InputFile compiledShader;
  compiledShader.Open(fileName);
  compiledShader.Read();
  compiledShader.Close();

  bytecode.BytecodeLength = compiledShader.GetSize();
  bytecode.pShaderBytecode = compiledShader.GetBuffer();
}
To get a better class design, we have extracted the file reading functionality into a separate class which we will cover in a bit. Once the file is read, and keep in mind that this is kind of like a binary buffer with compiled data and defined size, we just have to store a pointer to that data and its size in a D3D12_SHADER_BYTECODE structure. This is the data we have to pass to the GPU Pipeline State object.
Also keep in mind, that since this class is holding the pointer to a raw data in memory, it is also responsible for freeing that memory once we are done with this. In this case we will simply call the delete in class destructor.
Input File
For the sake of completion, let’s cover the class that we will use to read the files into a buffer.
class InputFile : public File
{
public:
  InputFile();
  ~InputFile();
  virtual void Open(LPCSTR fileName) override;
  void Read();
  void* GetBuffer();
  DWORD GetSize();
private:
  DWORD fileSize;
  char* fileBuffer;
};
Class design is pretty simple, we will allocate some memory and read the data from file into that memory.
void InputFile::Open(LPCSTR fileName)
{
  File::Open(fileName, GENERIC_READ, OPEN_EXISTING);
}
To open the file, we have to provide the flag GENERIC_READ, since that is what we want to do. Additionally, we only want to open the file if it exists, and that is why the OPEN_EXISTING flag is there. We provide those arguments to the base File class Open function.
void InputFile::Read()
{
  fileSize = GetFileSize(fileHandle, NULL);
  fileBuffer = new char[fileSize];
  if (!ReadFile(fileHandle, fileBuffer, fileSize, NULL, NULL))
  {
    exit(3);
  }
}
The Read function is where the magic happen. Since we already have a file handle, first we have to retrieve and store the size of the file. Then, when we know how much data we have to store, we allocate that amount on the heap. Finally, we call the ReadFile function that will read the entire file into that fresh memory.
Performance Corner
In the Performance Corner, we will not be actually doing anything special, but instead we will look at the compiled vertex shader. Normally, we should be able to get that code back in the RednerDoc, however, with the current state of the code, we will not. So sit back, relax, and let’s together look at our compiled shader.
define void @main() {
  %1 = call float @dx.op.loadInput.f32(i32 4, i32 0, i32 0, i8 0, i32 undef)
  %2 = call float @dx.op.loadInput.f32(i32 4, i32 0, i32 0, i8 1, i32 undef)
  %3 = call float @dx.op.loadInput.f32(i32 4, i32 0, i32 0, i8 2, i32 undef)
  %4 = call float @dx.op.loadInput.f32(i32 4, i32 0, i32 0, i8 3, i32 undef)
  call void @dx.op.storeOutput.f32(i32 5, i32 0, i32 0, i8 0, float %1)
  call void @dx.op.storeOutput.f32(i32 5, i32 0, i32 0, i8 1, float %2)
  call void @dx.op.storeOutput.f32(i32 5, i32 0, i32 0, i8 2, float %3)
  call void @dx.op.storeOutput.f32(i32 5, i32 0, i32 0, i8 3, float %4)
  ret void
}
This is the DXIL ( DirectX Intermediate Language ) compilation output of our vertex shader. Now you can see that HSLS programs gets compiled, just as the C++ programs that you are used to. This DXIL code is ready to be consumed by the GPU driver to translate it into hardware specific language.
Even though you really don’t have to understand DXIL, we will give it a quick glimpse. If you recall, our main function took a float4 vertex input position, and it simply returned the same float4 position. This is exactly the same what is happening here. First four lines are basically reading the float4 input position into local variables by calling a function loadInput(). The last four lines are basically returning those values stored in the local variables by using the function storeOutput().
Summary
In this chapter we have touched the surface of the GPU programing. We have created our first GPU programs, which are called shaders. We have create one Vertex Shader, which gets called for each vertex of the input geometry, as well as one Pixel Shader, which is called once for each pixel covered by that geometry and returning the final color of that pixel.
We also have learned a little about the HLSL, just enough to understand what we are doing in this lecture. Finally, we have learned how can we use Visual Studio to help us with the shader compilation and how to make it automatic to copy the compiled shader files to the directories we want them in.
In the next chapter, we will actually put our compiled shader to a bigger structure, called Pipeline State that will define the state of the entire GPU pipeline. And we will also learn what GPU pipeline is 🙂
Source code for this part of the course can be found under chapter “CH08” in this repository here: https://github.com/bboczula/GameEngineCourse.git