Introduction
In this chapter we will focus on a so called Render Target. From the high-level perspective, a Render Target is a texture into which the GPU will be rendering the frame. The thing is, we already have two textures that are ready to function as Render Targets. They were created along with the Swap Chain and they are referred to as a Front and a Back Buffer. There are a couple of things that we need to take care of, like texture internal state management, the Descriptor Heap management and stuff like that, but we can handle this. By the end of this chapter we will achieve a very impressive effect of the window blinking in two colors.
Architecture
We continue the refactoring of the engine. Remember, we want to have a wrapper classes for the raw DirectX 12 pointers, maybe encapsulating some common behaviors, to make our lives easier.
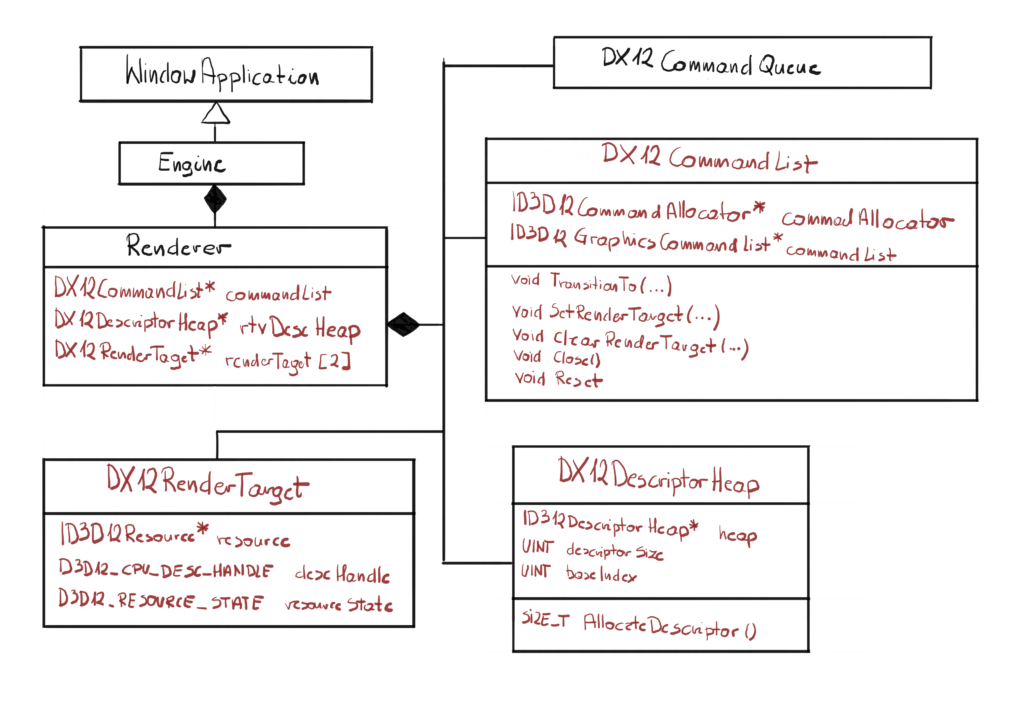
First of all, I have extracted the functionality related to the Command List to a separate class. This class will grow along with the things that we will be able to do. For now we can basically Reset and Close the underlaying Command List, we will add resource transition and setting and clearing Render Target.
Then we have added two new classes: DX12RenderTarget and DX12DescriptorHeap. The first one will for now keep all the necessary information, so when we pass this to the DX12CommandList, it will have all the necessary data to set it as a Render Target. The DX12DescriptorHeap will manage a heap of small structures called descriptors, that contain all the necessary information about the resource.
Finally, you might have noticed that I have added the “DX12” prefix to some classes. Those classes are wrappers of the raw DirectX 12 pointers, I wanted to make that distinction very clear to someone who is reading the code later. This could come in handy especially if at some point we will decide to support a new API like DirectX 11, OpenGL or Vulkan.
Render Target
Let’s go back a couple of chapters, specifically to the one where we created the Swap Chain. You might recall that we have created an infrastructure for the frame presentation, particularly the Front and Back Buffer. Front Buffer is used for frame presentation on the monitor, while Back Buffer is used by the GPU to render the next frame.
Resources
Those two buffers can be considered by DirectX 12 as resources. Resources are very physical things that physically occupy a chunk of memory. They can have its own format, dimensions and so on. They can even have sub-resources. However, for a single resource there can be many ways that those it can be used. For example at one point we can draw something to the resource, but later we can read that data in order to draw something else.
Render Target View
As you can see, even though this is a single resource in memory, there can be many ways to interpret that resource, or we can say the there can be many views of that resources. There are thre different views of the resource:
- Constant Buffer View
- Render Target View
- Shader Resource View
The buffers that has been created for us along with the Swap Chain are the ones the will be used for frame presentation, therefore they will be treated as Render Target View only. Each view contains a little bit of information that describes the resource from its point of view. This information is stored in a small structure, called descriptor.
Resource Barriers
We have learned that we can create different views of the very same resource, but there is more to that. The resources has their own internal states. On one of the Microsoft blog posts we can read that a resource state is a description of how the GPU intents to use that resource. There are quite a lot of possible states, represented by the D3D12_RESOURCE_STATES flags. There are many more resource states than views, they are used for more fine grained management.
In general, there are two types of resource states – read only and read/write. Each resource can be in couple of states at the same time, you just need to logically combine several flags together. All of those flags have to be from the same category though – you can’t combine read only states with read/write states.
One of the most important things that you can do with resource is the transition to a different state. For instance, at some stage of the rendering, we can write something to a resource, but later we might be using the data stored in that resource as input for other rendering algorithms. That is where we need to transition that resource between states to ensure data consistency.
At the current stage, we only have two resources, the Back Buffer and the Front Buffer. For the rendering part we want that resources to be in the D3D12_RESOURCE_STATE_RENDER_TARGET state, so we can write the outcome of the rendering there. But when we are done with that, we want to transition that to the D3D12_RESOURCE_STATE_PRESENT state, so we can perform the flip operation.
State transitions needs to be recorder on the Command List. Proper resource state management is the art of itself. There can be many situation where incorrect barriers can lead to the performance degradation.
For example, you have to be careful when transitioning resource from write state to read state. First of all, setting the barrier will prevent GPU scheduler to schedule read operations along with write operations. The GPU needs to make sure that all potential write operations are finished before we can safely read the resource. That can potentially mean that no other operations can be done until the writes are complete.
Class Design
The main purpose for this class is to make binding it to the pipeline as easy as possible. Potentially, we would like to simply pass a pointer to our Render Target instance to the Command List and it will take care of the rest. Therefore, the class design is pretty straight forward.
class DX12RenderTarget
{
  friend class DX12CommandList;
public:
  DX12RenderTarget(
    ID3D12Device* device,
    ID3D12Resource* resource,
    D3D12_CPU_DESCRIPTOR_HANDLE descriptor,
    D3D12_RESOURCE_STATES state);
  ~DX12RenderTarget();
private:
  ID3D12Resource* resource;
  D3D12_CPU_DESCRIPTOR_HANDLE descriptorHandle;
  D3D12_RESOURCE_STATES resourceState;
};
For the purpose of resource binding, we need to keep the pointer to the resource associated with the view, the descriptor handle (we will come to that in just a bit) and the current resource state that we need track.
The Render Target class doesn’t do much. Basically, we just need to create the Render Target View in the constructor.
DX12RenderTarget::DX12RenderTarget(
  ID3D12Device* device,
  ID3D12Resource* resource,
  D3D12_CPU_DESCRIPTOR_HANDLE descriptor,
  D3D12_RESOURCE_STATES state)
    : descriptorHandle(descriptor), resourceState(state),
      resource(resource)
{
  device->CreateRenderTargetView(resource,
    nullptr, descriptorHandle);
}
This is how you create the Render Target View, by calling the CreateRenderTargetView() function on the Device. The function takes three parameters.
- Pointer to the actual resource. The resource will be created and managed outside of the class, we will use it only for view creation and we will store it for resource binding purposes.
- Pointer to the structure describing the sub-resources of the resource. This is an advance topic, so this time we will set it to nullptr, which basically will create the default resource view.
- Descriptor handle, which is a pointer-like address of the descriptor on the Descriptor Heap. This also will be managed outside of this class, we will only store the handle for the future uses.
The function does not returns the HRESULT, so we don’t have to check for errors here. There it is, just storing the data. In the near future, we will create a separate Command List class, where we will pass a pointer to the Render Target object, and it will have all the necessary information to properly bind it to the pipeline.
Descriptor Heap
Descriptors are small structures that describe resources to the GPU. They are stored in a hardware specific format, meaning that it is different depending on what is your GPU vendor. Descriptors contains information about the resource view, like the dimensions for the textures, or the format in which the pixel values are stored.
In DirectX 12 all the descriptors are created and stored in a dedicated structures, called Descriptor Heaps. You can think of Descriptor Heap as an array of descriptors. You can manipulate that array, by adding new or overwriting existing elements. You can create as many Descriptor Heaps as you want. There are four types of Descriptor Heaps: CBV/UAV/SRV, RTV, DSV and Sampler that can store descriptors for corresponding types of resources.
You can reference Descriptors in the Descriptor Heap using Descriptor Handles, which effectively are a lot like pointers. Descriptor Handle is being passed to the CreateRenderTargetView() function, so it can output the decoded descriptor to the position determined by the handle.
Every descriptor heap is visible for the CPU, but optionally can be visible for the GPU too. The reason for this is to enable you to have advanced structures. In our simple engine we will have just one Descriptor Heap, that will contain descriptors for all our resources – we will not really have a lot of them. Professional engines have to deal with thousands of descriptors, so they have to do it effectively. Descriptor Heaps can be immediately edited by the CPU, they can’t be modified by the GPU though. Only CBV/UAV/SRV and Sampler descriptor heap can be directly used in the GPU programs.
Class Design
Let’s take a look at the new DX12DescriptorHeap class interface.
class DX12DescriptorHeap
{
public:
  DX12DescriptorHeap(ID3D12Device* device,
    D3D12_DESCRIPTOR_HEAP_TYPE);
  ~DX12DescriptorHeap();
  SIZE_T AllocateDescriptor();
private:
  ID3D12DescriptorHeap* heap;
  UINT descriptorSize;
  UINT baseIndex;
};
Now let’s spend a little time here, because we need to understand the idea behind this class. First of all, you will have a separate DX12DescriptorHeap instance for each of the Descriptor Heap type, that is the reason why we set that in the constructor parameter. For now though, since we only have Render Target View resources, we will create only one Descriptor Heap that will keep those type of descriptors.
Basically what we will do is we will create a descriptor heap of the predefined, constant size of 1000. The reason why we are doing this is that we want to avoid doing too many operations on the heap. We could for example create a vector-like structure, so when you add new descriptor, you will just create new heap of the size one bigger than before, copy all old descriptors, add the new one and then discard the old heap. However, since our engine is really simple, the chosen solution should definitely suffice.
Finally, they way we will be using this class is kind of like a fixed size stack. If we will need the the descriptor, we will return the descriptor handle of the first free descriptor. As soon as we do that, we will increment the base index to point at the next free descirptor.
Now, for the sake of the simplicity, we will leave it like that. Normally, we should have a way to free descriptor when they no longer needed and make it usable for the next one. In professional engines, where there are many threads responsible for the rendering, we would also have to make sure that the synchronization is correct.
Command List
One of the architecture changes we did in this chapter – to align with the policy to wrap our classes around raw DirectX interfaces – was to create a new Command List class.
First of all, we will only enable operations on the ID3DCommandList in the new class interface. Second of all, the Command List class will contain the Command Allocator. So in our architecture, single Command Queue will have its own Command Allocator. This could obviously be done in some smarter way, but we first want to have a functional engine, we will care about polishing the performance later.
| A friend class can simply access all the private and protected members of the other class. |
Finally, we will make the Command Queue our friend. That basically means that Command Queue can use our private member. This decision actually increases the encapsulation. If Command Queue wasn’t our friend, we would have to add a getter method and basically allow any other class to use our raw pointer, which is something we want to avoid.
Class Design
Let’s start by looking at the design of the DX12CommandList class.
class DX12CommandList
{
  friend class DX12CommandQueue;
public:
  DX12CommandList(ID3D12Device* device);
  ~DX12CommandList();
  void TransitionTo(DX12RenderTarget* renderTarget,
    D3D12_RESOURCE_STATES nextState);
  void SetRenderTarget(DX12RenderTarget* renderTarget);
  void ClearRenderTarget(DX12RenderTarget* renderTarget,
    const float* color);
  void Close();
  void Reset();
private:
  ID3D12CommandAllocator* commandAllocator;
  ID3D12GraphicsCommandList* commandList;
};
This is the class that will do most of the work related to the rendering. We will basically add simple functions that will wrap around small Command List functionalities. Just like SetRenderTarget – you have all the data in the DX12RenderTarget class, the function will simply do a couple of steps to add that properly to the Command List. Let’s examine some of the functionalities.
Constructor
So first we need to consider the class initialization.
DX12CommandList::DX12CommandList(ID3D12Device* device)
{
  ExitIfFailed(device->CreateCommandAllocator(
    D3D12_COMMAND_LIST_TYPE_DIRECT,
    IID_PPV_ARGS(&commandAllocator)));
  ExitIfFailed(device->CreateCommandList(0,
    D3D12_COMMAND_LIST_TYPE_DIRECT, commandAllocator,
    nullptr, IID_PPV_ARGS(&commandList)));
  commandList->Close();
}
This is nothing new, we just need to extract this functionality to the new class. So we create the Command Allocator along with the Command List.
SetRenderTarget
This function will simply set the render target passed in as the parameter.
void DX12CommandList::SetRenderTarget(
  DX12RenderTarget* renderTarget)
{
  commandList->OMSetRenderTargets(1,
    &renderTarget->descriptorHandle, FALSE, nullptr);
}
We do that by calling the OMSetRenderTargets() on the Comannd List interface. The “OM” stands for “Output Merger” and we will cover this in the next chapter.
Generally we want to pass descriptors to the resources we want to pass. This function allows to pass more than one descriptor, and it is indicated by the first parameter. We will allow to pass only one at the time, that is why we pass 1.
The second parameter is an array of the Descriptor Handles. They can either be contiguous or not, and that is indicated by the third bool input parameter. Final parameter is an array to the stencil Descriptor Handles. That is and advanced subject that we will cover way later in the course.
TransitionTo
This function is a little bit more complicated.
void Sapphire::DX12CommandList::TransitionTo(
  DX12RenderTarget* renderTarget,
  D3D12_RESOURCE_STATES nextState)
{
  D3D12_RESOURCE_BARRIER barrier;
  ZeroMemory(&barrier, sizeof(barrier));
  barrier.Type = D3D12_RESOURCE_BARRIER_TYPE_TRANSITION;
  barrier.Flags = D3D12_RESOURCE_BARRIER_FLAG_NONE;
  barrier.Transition.pResource = renderTarget->resource;
  barrier.Transition.StateBefore =
    renderTarget->resourceState;
  barrier.Transition.StateAfter = nextState;
  barrier.Transition.Subresource
    = D3D12_RESOURCE_BARRIER_ALL_SUBRESOURCES;
  commandList->ResourceBarrier(1, &barrier);

  renderTarget->resourceState = newResourceState;
}
Let’s take the knowledge from the Resource Barriers paragraph into practical use. The transition is really a command that we record on the Command List. We can only put barriers for Render Targets, but in the future we could add overloaded function, with different types as parameters.
In order to properly transition resource, we basically need the current state, the next state and the pointer to a resource. We can also apply some flags, but they are irrelevant at the moment.
The current state is conveniently kept in the DX12RenderTarget class. The next state is passed as the parameter. We have everything we need to record the command. The only thing that we need to remember is to set the new state of the resource, which we do in the last line of the function.
The ResourceBarrier() function takes only two parameters, number of barriers and an array of D3D12_RESOURCE_BARRIER structures. As for now we will only allow one barrier at the time.
ClearRenderTarget
This function will set all of the pixels in the Render Target to the same color, provided as an argument.
void DX12CommandList::ClearRenderTarget(
  DX12RenderTarget* renderTarget, const float* color)
{
  commandList->ClearRenderTargetView(
    renderTarget->descriptorHandle, color, 0, nullptr);
}
The ClearRenderTargetView() function takes four arguments. The first is a Descriptor Handle, which we conveniently store in the DX12RenderTarget class. Next, we have to provide the color we want each pixel of the Render Target to have after clear. The color has four elements, red, green, blue and alpha, each float and each in the range of 0.0f to 1.0f. The value represents the contribution of the element to the final color. If we want a pure red for example, the red component would be set to 1.0f, the rest to 0.0f. The alpha represents the transparency. If we want our pixel not to be transparent at all, we will set its alpha to 1.0f.
Two last parameters are not important to us for now. They basically allow us to clear only some parts of the Render Target, by providing rectangles that we want to cover. We want to clear the entire texture though, therefore we set those values to zero and nullptr.
Close and Reset
We will have two separate functions for closing and resetting the Command List.
void DX12CommandList::Close()
{
  ExitIfFailed(commandList->Close());
}

void DX12CommandList::Reset()
{
  ExitIfFailed(commandAllocator->Reset());
  ExitIfFailed(commandList->Reset(commandAllocator, nullptr));
}
We have introduced those two function for convenience and consistency. We don’t want other classes to operate on raw DirectX pointers. The Reset() function makes sure that our design is consistent. Whenever we reset the Command List, we also have to reset the corresponding Command Allocator.
Operating on Render Target
In this final part we will put all of our puzzle pieces together and make it work. In the Renderer class we will add two new functions, one for creating the Descriptor Heap and the other for creating Render Targets.
void Renderer::CreateDescriptorHeap()
{
  rtvDescriptorHeap = new DX12DescriptorHeap(device,
    D3D12_DESCRIPTOR_HEAP_TYPE_RTV);
}
For now, we only want one Descriptor Heap, the on which will store our two Render Target View descriptors. The CreateRenderTargets() function is a little bit more complicated.
void Renderer::CreateRenderTargets()
{
  D3D12_CPU_DESCRIPTOR_HANDLE rtvHandle;
  for (UINT i = 0; i < FRAME_COUNT; i++)
  {
    ExitIfFailed(dxgiSwapChain->GetBuffer(i,
      IID_PPV_ARGS(&resources[i])));
    rtvHandle.ptr = rtvDescriptorHeap->AllocateDescriptor();
    renderTargets[i] = new DX12RenderTarget(device,
      resources[i], rtvHandle, D3D12_RESOURCE_STATE_COMMON);
  }
}
First of all, we need to have two separate resources for Render Targets – one for Front Buffer and the other for the Back Buffer. For each of this resource we allocate one empty descriptor from the heap. Then we create a new instance of DX12RenderTarget, providing the device, pointer to a resource, empty descriptor handle and the initial state. This is important because Swap Chain back buffers automatically start out in the D3D12_RESOURCE_STATE_COMMON state. So this is how our RTV Descriptor Heap looks like at the moment.
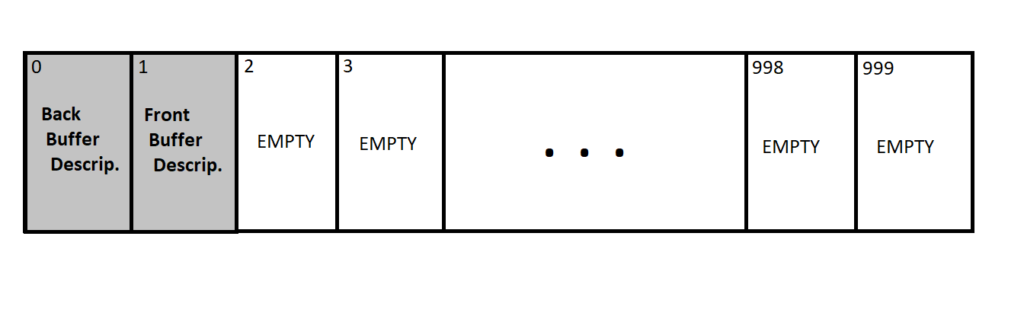
The two first spots are occupied by the descriptor filled by our Render Target class. The rest out of the 1000 descriptors are free to use, and the base index currently points to the descriptor at the position number two.
Finally we will keep our two RenderTarget instances in an array. The reason for this is that when we will be recording our commands, we could then just use the current buffer index to pick the proper one.
Recording Command List
Now let’s focus on the RecordCommandList() function, since this is where the magic happens. The function looks different than before, not only because we have new commands we want to record, but we have also refactored the CommandList class.
void Renderer::RecordCommandList()
{
  const float clearColorOne[] = { 0.3098f, 0.4509f, 0.7490f, 1.0f };
  const float clearColorTwo[] = { 0.1176f, 0.1882f, 0.4470f, 1.0f };

  commandList->Reset();
  commandList->TransitionTo(renderTargets[currentFrameIndex],
    D3D12_RESOURCE_STATE_RENDER_TARGET);
  commandList->SetRenderTarget(renderTargets[currentFrameIndex]);
  commandList->ClearRenderTarget(renderTargets[currentFrameIndex],
    currentFrameIndex ? clearColorOne : clearColorTwo);
  commandList->TransitionTo(renderTargets[currentFrameIndex],
    D3D12_RESOURCE_STATE_PRESENT);
  commandList->Close();
}
And now is the time where our Command List starts to take shape. Let’s go one by one and see what exactly is happening. First of all, we have to reset the Command List. We can safely do that, because we wait with any CPU work before GPU is done doing its work, so we are in the clear. Remember that the Reset() method clears not only the Command List, but also the Allocator associated with it. We are ready to record commands.
And here comes the first resource transition. We have to make sure that our resource associated with the Render Target is in the RENDER_TARGET state before we will bind it to the rendering pipeline. We have set it initially to the COMMON state, so we have to call the TransitionTo() function. After that we can safely call the SetRenderTarget() method and now we have our resource bound to the pipeline. In that function we will use the Descriptor Handle that points to a proper Descriptor in the Descriptor Heap.
Next is the most exiting part. The goal is to clear each Render Target with different color. Then when we will be presenting it one after another, we should see a blinking window effect. How nice! When we pick the color, we can call the ClearRenderTarget() method.
Now when we have created all the necessary commands, we are ready for frame presentation. Now in order to do it properly, our resource associated with the Render Target needs to be in the PRESENT state, and that is the reason we are calling the TransitionTo() method yet again.
Finally, there are no more commands we need to record, so we are can safely close the Command List. And that is it! What a ride we had in this episode. You can now enjoy… the blinking screen?!? Yes! Fascinating and really satisfying, isn’t it!
Performance Corner
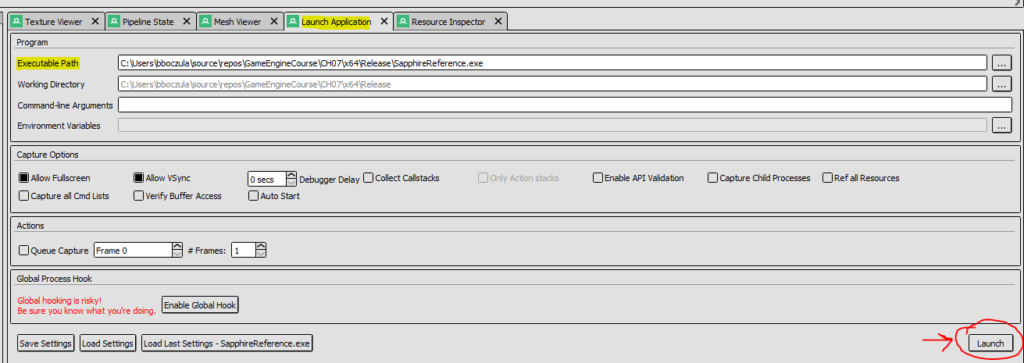
Now that we have some actual commands in the Command List, we might as well start to learn how to monitor what happens on the GPU. One of the most useful tools for this is RenderDoc. RenderDoc basically records all the commands that are being passed to the DirectX runtime for every frame, and they it presents it to the user, with the ability to investigate individual draw calls, resources, and so on.
In order to start recording, select the Launch Application and then in the Executable Path find the exe file of our engine. For now, let’s leave all the other options alone and then click the Launch button.
You should now see our blinking screen, but this time with some overlay over it. It gives you some basic statistics, like frame time or FPS counter. Whenever you’re ready, hit the F12 button which will collect all the commands between two closest calls to Present() method, effectively recording the one single GPU frame. You can collect more than one frame, but for now lets just collect one and then close the application.
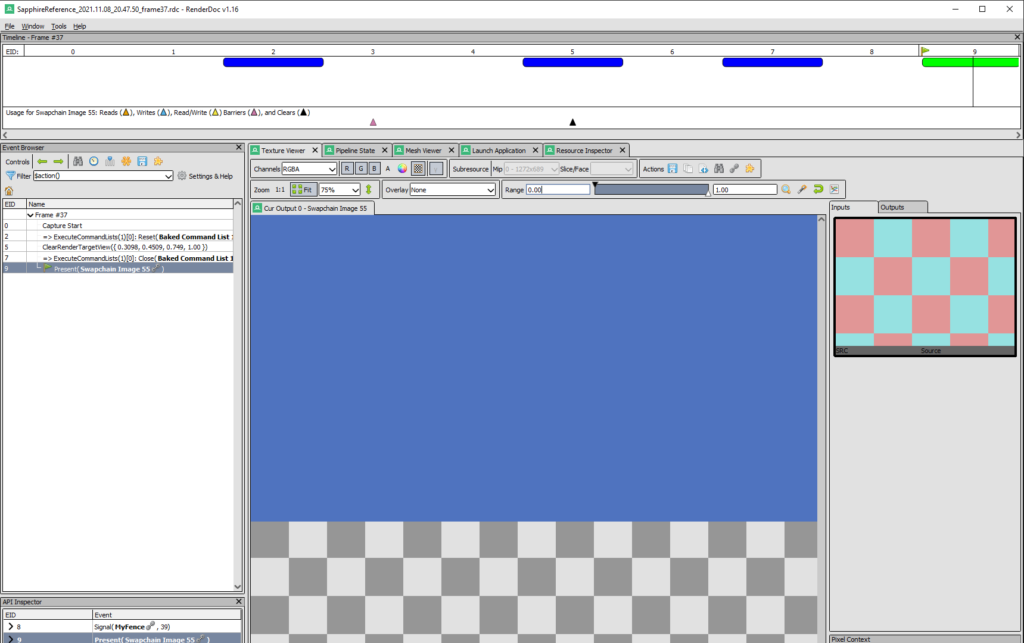
Once you close the application, wait a little while for RenderDoc to load the capture, and you should be able to see something similar to the figure 4. Now there are a lot of things that we can look for, but for starters let’s just focus on the left panel.
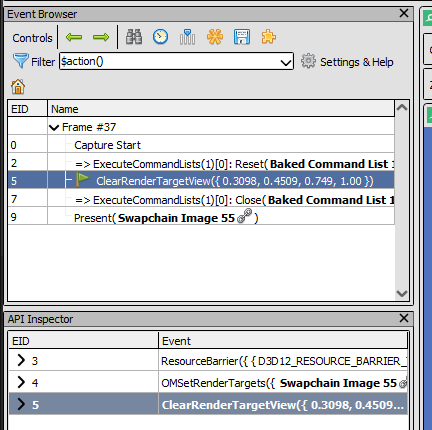
Event Browser, along with the API Inspector shows every command on the Command List, along with some additional information. Each command has its own EID. In the Event Browser we can only see the actions that are important from the rendering perspective, commands that actually change something like draw something on the screen. When you click on that action, in the API Inspector you can see all the commands that lead to that action.
For example, when we click the command with EID 5, ClearRenderTargetView, in the API Inspector we see that prior to that, we called the ResourceBarrier() function and the OMSetRenderTargets() functions. The similar information, but in different format, can be seen on top of the window in the Timeline section. The actionable commands have a corresponding “button” that you can click. And this is the basics of working with RenderDoc. Don’t worry, we will be looking at this tool a lot in the near future.
Summary
I think it is safe to say that we have made the biggest visual step so far. I mean, I know that for some people this blinking window is silly, but we have done so much to get here, that this is really rewarding after all.
Let’s recall what we have done in this chapter. First of all, we extracted the Command List functionality to a separate class. So instead of calling the Command List methods directly, we now call the wrapper methods and effectively we have better control over what is happening.
Then we have created new Render Target class, and two instances of it. Every frame we clear and present one Render Target and then another. We use two different colors in order to achieve the blinking effect. We also managed the resource states of the associated resources.
Finally, we have created a Descriptor Heap, on which we will be storing our descriptors. The Descriptor Heap simply allocates a fixed number of descriptors and then keeps the position of the first free descriptor. Other classes can “allocate” one descriptor from the heap, the heap will return the first available Descriptor Handle and then move the base pointer to the next element.
In the next chapter we will start looking at the GPU pipeline and the rasterization process. We will learn how to program GPU cores and how we can pass parameters for those programs. I can’t promise that the next chapter will bring a new stunning visual improvement, but I can tell you this – the chapter after that will be the jewel and most rewarding in terms of visual. In that chapter we will be drawing our very first triangle on the screen.
Source code for this part of the course can be found under chapter “CH07” in this repository here: https://github.com/bboczula/GameEngineCourse.git