Introduction
In this chapter we will introduce the somewhat complex concept of GPU memory management, which in DirectX 12 is now more explicit than ever. Fortunately, there is a fairly simple way to allocate the memory, so – in the spirit of this course – we will take the shortest possible path to the achieve the goal, which is allocating memory for our resources.
We will not get anything new on the screen, but since this topic is fundamental to DirectX 12, I decided to spend a separate chapter just to cover this. But, at the very end of this chapter, we will allocate some big chunk of memory and we will be able to actually see that in the Task Manager.
Architecture
We will not introduce any new classes, but expand the existing one – the DX12Resource class.

We have added a new constructor to handle new allocation. Previously, the Swap Chain took care of all memory allocations for Front and Back buffer, this time we will have to allocate the memory ourselves. We will also add a method to upload the data to the newly allocated memory from the system memory.
Memory Management Basics
In DirectX 12 memory management is explicit. In DirectX 11 we were only creating abstract resources and then it was driver’s responsibility to manage memory. Those times are over – now it is up to the engine to properly allocate and manage resource memory. This introduces some complexity, but also allows for more fine tuned optimizations and potential performance gains.
I assume that you already know how to program in C++, so the concept of memory management is nothing new. You have your stack and your heap, which are located in the local RAM memory. When you use automatic variable you know that it is allocated on the stack and then it gets destroyed when it gets out of scope. You also know that you can allocate some memory on the heap by using the keyword new, and you can store some data in there. You are also responsible for freeing that memory once it is no longer needed by calling delete, otherwise you will get memory leak. Well, from now on this will get a little more complicated. Don’t worry though, as always, we will eat that elephant called “explicit memory management” one spoon at the time.
Memory Address Space
Similar to the local memory, the GPU memory has both physical and virtual address spaces. Physical address space represents the physical VRAM. Each address in that space points directly to the cell in VRAM. Virtual address space on the other hand gives you different address and internally, this address is mapped to the address in physical address space.
The concept of virtual memory is already present when it comes to CPU programming. The operating system maintains a page table for each process, and uses it to translate virtual addresses to physicals memory addresses.
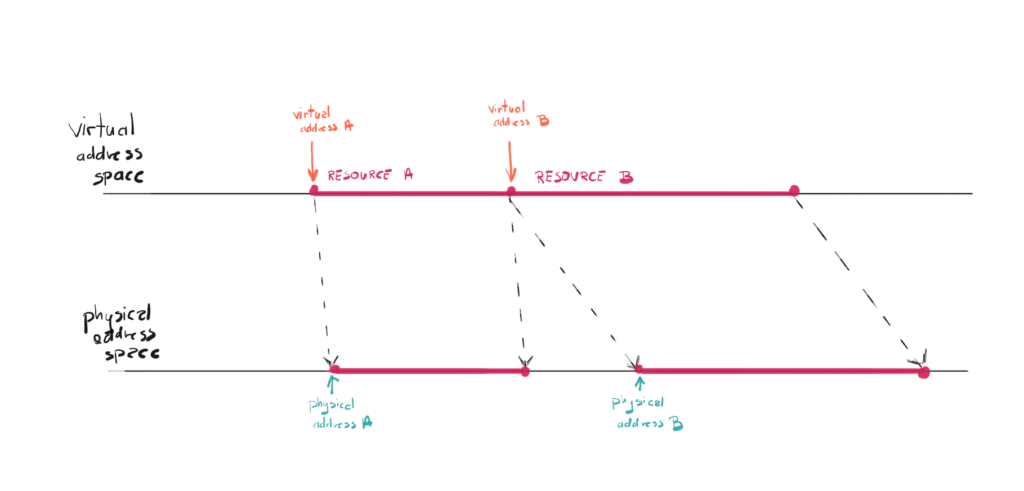
This solution allows for couple of interesting techniques, like for example you can allocate more virtual memory that the available physical memory. If the data you will request is not in the physical memory, there will be page fault and system will fetch that data from other storage, like a hard disc. In case of the GPU, this additional layer of abstraction can hide for you the innerworkings, like for example some of the data can be sometimes even kept on local memory, when CPU will often be accessing that memory.
Memory Types
Besides the local CPU memory (RAM) we now have additional memory in the form of GPU memory, sometimes referred to as VRAM. For dedicated GPUs this VRAM is physically placed on the GPU die and its content are available for the GPU extremely fast. The story is different though for integrated GPUs. For them, the GPU memory is actually a part of the RAM memory, local to the CPU. The operating system allocates some of that memory for the use of the GPU. The similar situation is with consoles, they utilized something called UMA which stands for Unified Memory Model.
On top of that, VRAM can have different “sections”, and those sections have defined types. Those sections as well as the way they are used differ from one GPU vendor to another, and in professional engines those differences has also be taken into consideration. Those different sections are meant to handle different scenarios.
Memory Allocations
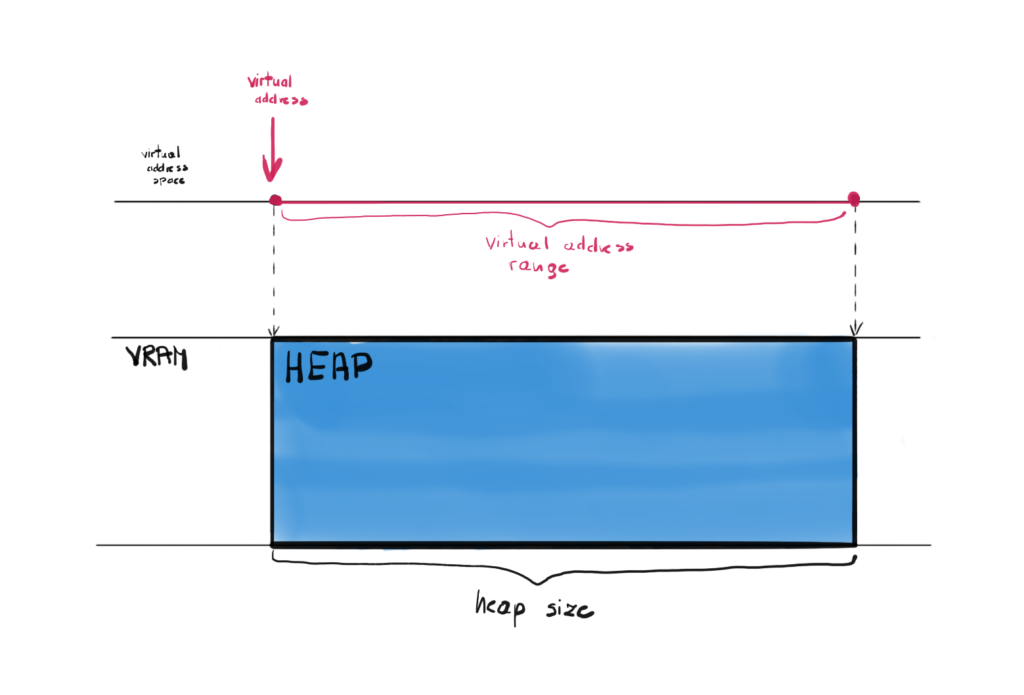
In DirectX 12 you can explicitly allocate a memory block with a given size. This physical memory block is referred to as a heap. This is very similar concept when you allocate new memory in C++ from the heap.
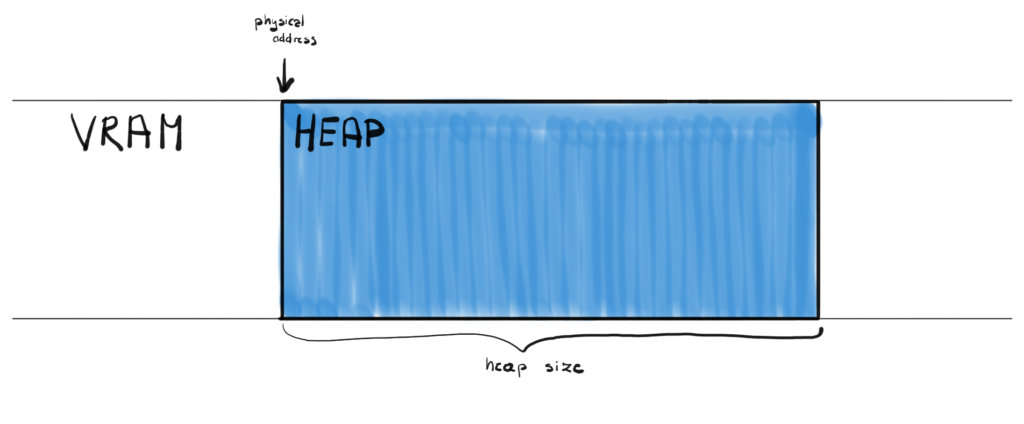
In order to allocate a heap you call the CreateHeap() function on your Device, which takes D3D12_HEAP_DESC as an input parameter, where you can define the size of the heap among other things. Once heap is created, you can create so called “placed resources” and provide offset in bytes within the heap to indicate where to put them exactly.

This seems to be the most efficient model, since you allocate memory only once, but there are a lot of nuances and things to consider when writing this kind of allocator. There is however a simpler way to allocate GPU memory.
Committed Resources
The other type of resource is so called Committed Resource. Creating this kind of resource does two things at the time. You create the resource itself (and allocate virtual memory for it) and in the same time you automatically allocate the heap on the physical memory of the exact size as the resource. This is much simpler solution from our perspective, but can be more costly, since each resource creation calls the memory allocation which can be expensive. Now we don’t even have to call the CreateHeap() function anymore, we can just create our DirectX resources and the physical memory allocation will be done for us.
To create committed resource you can call the CreateCommittedResource() function on your Device. This function lets you define some properties of the underlying heap as well as the properties of the resource itself. <little more about the function>
Heap Types
The heaps you create are not all the same, there are four type of heaps that you can define.
The first one is the default heap. This type of heap doesn’t provide CPU access to its contents, meaning that the CPU can’t neither read from nor write to that heap. This type of heap is expected to be used the most and to contain most of the necessary data. The GPU has the fastest access to this type of memory.
The second one is the upload heap. This kind of heap is optimized to copy – or upload – data from the CPU to the GPU. In other words, this kind of heap is accessible for the CPU to write data to and it is also accessible for the GPU to read that data. This type is optimized for the situation where CPU writes to the buffer only once, while the GPU reads from that heap often, possibly every frame.
The third one is the readback heap. This is the type of heap that works the other way around than the upload heap. This time the GPU can write to that heap and the CPU can read from it. It could be used in situations where the result of the GPU computation is needed on the CPU side.
There is one more type, the custom heap, but its usage is very complicated and is out of the scope of this course.
The reason to have different types of heaps is first of all to differentiate the CPU access rights, and second of all for the performance reasons. For example, the upload heap can be used to pass the data from the CPU to the GPU, but it in the same time this might not be the fastest memory to access from the GPU, which can cost some performance.
Uploading CPU Data
Now the only thing left when you created your committed resource on the upload heap is to somehow transfer the CPU data to that heap. In order to upload that data we have to Map and Unmap the resource, by calling the Map() and Unmap() functions respectively.
The Map() function called on a Resource returns a CPU pointer to itself. With that pointer we can simply copy our data to that resource using for example memcpy() function. Once done, we can call the Unmap() function to invalidate that pointer.
DX12Resource Class
So far we only had two resources – the Back and the Front Buffer. They were created for us along with the Swap Chain, so we haven’t directly created any DirectX resources yet. This is about to change.
Now it is time to update our DX12Resource class. What we want is a new constructor that will create a committed resource for us.
class DX12Resource
{
  friend class DX12CommandList;
public:
  DX12Resource(void* source, D3D12_RESOURCE_STATES state);
  DX12Resource(DX12Device* device, UINT64 bufferSize);
  ~DX12Resource();
  void Upload(void* source, size_t size);
  D3D12_GPU_VIRTUAL_ADDRESS GetGpuVirtualAddress();
  ID3D12Resource* GetResource();
private:
  D3D12_RESOURCE_STATES state;
  ID3D12Resource* resource;
};
Resource Creation
This constructor will be used to actually create an DirectX Resource. Since by design we have decided not to manage the GPU memory, this constructor is a great place to create the committed resource, which will allocate the heap that will exactly fit our resource.
DX12Resource::DX12Resource(
  DX12Device* device, UINT64 bufferSize)
  : resource(nullptr), state(D3D12_RESOURCE_STATE_GENERIC_READ)
{
  auto heapProps = CD3DX12_HEAP_PROPERTIES(
    D3D12_HEAP_TYPE_UPLOAD);
  auto desc = CD3DX12_RESOURCE_DESC::Buffer(bufferSize);

  ExitIfFailed(device->GetDevice()->CreateCommittedResource(
    &heapProps, D3D12_HEAP_FLAG_NONE, &desc,
    D3D12_RESOURCE_STATE_GENERIC_READ, nullptr,
    IID_PPV_ARGS(&resource)));

}
To create that resource we have to call CreateCommittedResource(). Two most important input parameters are Heap Properties and Resource Description. And thankfully, the D3DX12 helper library comes in handy.
The one important parameter for the GPU heap properties is the type of the heap. Since we assume that we will want to upload the data from the CPU, we want this heap to by of upload type. But keep in mind that this is not really performant solution. Most probably we will upload the data from the CPU only once and it will be read by the GPU every frame, which is not really the best case scenario for the upload heap. Better solution would be to use upload heap just once to stream the data to the GPU memory, and then do another copy to the default heap, which is way more performant in this scenario. At some point we most probably address this issue and will do proper memory management.
Then, the resource descriptor is the buffer, and the important input parameter is the size of the resource, and in turn the size of the heap allocation.
Data Upload
The second new function in the class is the Upload() function.
void DX12Resource::Upload(void* source, size_t size)
{
  UINT8* resourceData;
  CD3DX12_RANGE readRange(0, 0);
  ExitIfFailed(resource->Map(0, &readRange,
    reinterpret_cast<void**>(&resourceData)));
  memcpy(resourceData, source, size);
  resource->Unmap(0, nullptr);
}
The input parameters are the void pointer to the CPU data we want to upload and the size of that data. The function itself does the Map/Unmap procedure to obtain the pointer to the heap. To get that pointer you call the Map() function, with the read range, and you get the pointer in the second parameter.
The D3D12_RANGE structure allows to desciribe the memory range. The begin field descirobes the offset in bytes of the beginning of memory range, while end describes the end offset, also in bytes. The empty range passed to the Map() function denotes that CPU won’t read any data back, which is exactly what we want – we only want to upload the data.
| The reinterpret_cast operator allows any pointer type to be converted into any other pointer type. This is rather unsafe operation and misuse of it can lead to potential problems. However, for such low-level operations like copying a fixed number of bytes, this could be the appropriate one. |
Then, with that pointer, you simply call the memcpy() function to copy the data. Lastly, you call the Unmap() function to invalidate the previously obtained heap pointer. There are scenarios, where you would leave the resource Mapped all the time, but we will by Unmapping it every time we upload.
Performance Corner
This Performance Corner will be a little different. This time, we will do some temporary changes in the code. We will try to create a fake resource and allocate an upload heap of 1 GB of memory. This should be quite easy, just add this line in the Renderer constructor (of course you have to add the pointer in the class declaration too). And remember, this is quite some chunk of memory, so it has to be deleted too.
<Constructor>
bigBuffer = new DX12Resource(device, 1024 * 1024 * 1024);

<Destructor>
delete bigBuffer;
No let’s run the program, give it a couple of seconds and then close it. But before you do, open the Task Manger and click the Performance tab, and lastly pick your main GPU on the right hand side.
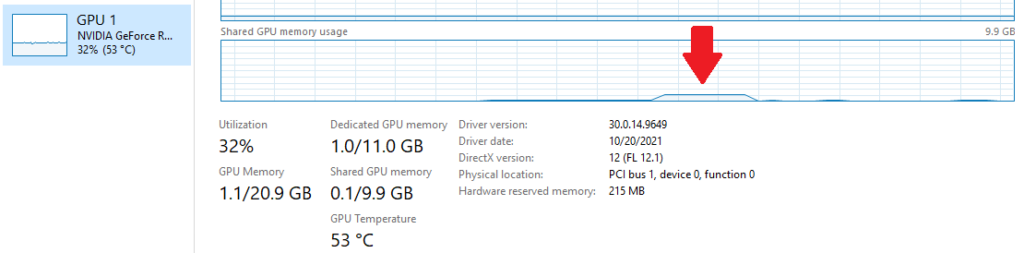
This little bump over there – that is our program’s memory usage. That is the 1GB resource that we allocated the upload heap. You might notice, that since this is an Upload heap, it was allocated from the Shared GPU memory pool. Shared memory is actually a chunk of RAM that operating system share with all the GPUs. This is because each of our resources is located in the upload heap. This is convenient, but of course not performant. The next step in memory management would be to only use upload heap to copy the data once, and they copy all that data to the dedicated GPU memory, which is usually extremely fast.
Summary
And there it is – as you can see, the memory management doesn’t have to be as hard as you might think. We chose the easiest solution, but we have also paved the way to more interesting and complex solutions, which we will definitely do in the more advanced part of this course.
In the next chapter – the last one from the first part – we will introduce geometry, we will use our newly created resource class, and finally we will finish the first version of the engine. This version would allow us to do some simple game development.
Source code for this part of the course can be found under chapter “CH10” in this repository here: https://github.com/bboczula/GameEngineCourse.git