Introduction
This is the part of the course where we finally will get to know DirectX 12. We will create couple of most important DirectX objects, that we will use extensively throughout the course. One to create other DirectX objects and resources, and the other to create the framework for work recording and submission to the GPU.
Architecture
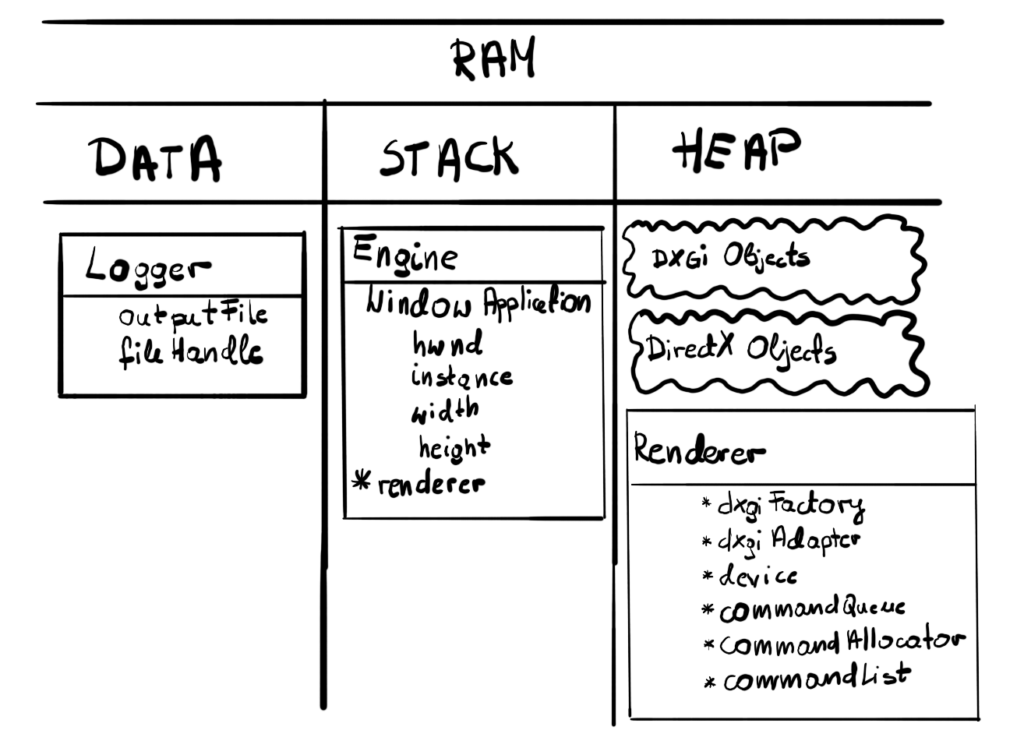
In this chapter we will expand our Renderer class, adding some new code to create DirectX objects. There are no significant architectural changes in the class diagram.
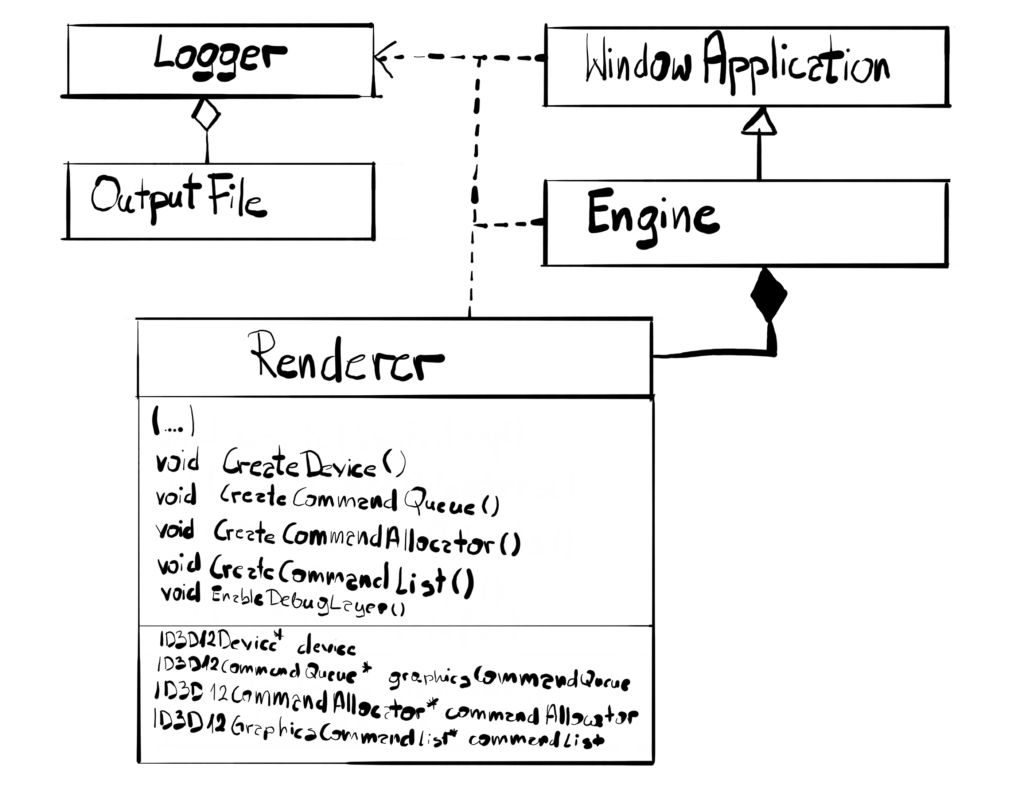
You might notice that our Renderer class grows, and in the near future it will grow even more. For now I’ll leave it as is, to focus on the things related to the engine, but we will address that at some point in the future since this is really not good design.
Device
And there it is – our first DirectX object – the Device. The Device is DirectX representation of the DXGI’s Adapter, which in turn is the representation of the GPU. So technically Device is the DirectX representation of the GPU that we will be working with. It is a singleton per adapter, meaning you cannot have more than one for each adapter and most likely you’ll end up with only one device, unless you explicitly want to use two GPUs. You need a valid Adapter to create the Device, that’s why we stored one in the previous section.
The Device is used to create various DirectX resources, like textures, buffers, and other DirectX objects. It is a COM object, so we have to create it using the provided function.
The Device supports the Debug Layer, meaning that we can technically get some feedback information if things go south. Don’t get yours hopes up though. Compared to DirectX 11, the DirectX 12 Debug Layer is really thin. DirectX 12 puts a lot of responsibility towards the developer, so there is only some stuff that it can help you with. Nevertheless, we will support it, since this is the only way we potentially can find out why the code is not working.
Finally, you can use the Device to check the supported Feature Levels. Each feature level represent some set of functionality available for given adapter. In the PC world, there are hundreds if not thousands different GPUs. There are some older ones or some new, hot, high-end ones. As the technology progresses, the new features are added to the API, like hardware accelerated Ray Tracing. The Feature Level represent a set of such features that denote some important milestones in the API evolution.
The application can ask the adapter if it supports given Feature Level. To be able to run DirectX 12, the GPU needs to support at least feature level 11.0 and this is what we require. If the GPU doesn’t support that then we will not proceed. However, if we had a working DirectX 11 implementation of the engine, we could have checked if by chance the GPU supports some lower Feature Levels. Knowing the highest Feature Level the GPU supports, the engine can tweak some internal parameters in order go get the best performance.
void Renderer::CreateDevice() { #if _DEBUGEnableDebugLayer();#endifExitIfFailed(D3D12CreateDevice(dxgiAdapter,D3D_FEATURE_LEVEL_11_0, IID_PPV_ARGS(&device)));}
To create the Device we will use the D3D12CreateDevice() function. As input parameters it takes the DXGI Adapter and the minimal required Feature Level. As output we will get the pointer to Device COM interface. If there are some problems or if the GPU doesn’t support the requested Feature Level, the application terminates.
Debug Layer
There is a piece of code there that is only compiled in the _DEBUG mode. It is responsible for enabling the DirectX Debug Layer. Let’s look at the EnableDebugLayer() functions.
void Renderer::EnableDebugLayer() { ID3D12Debug* debugInterface_0; ExitIfFailed(D3D12GetDebugInterface(IID_PPV_ARGS(&debugInterface_0))); debugInterface_0->EnableDebugLayer();ID3D12Debug1* debugInterface_1;ExitIfFailed(debugInterface_0->QueryInterface(IID_PPV_ARGS(&debugInterface_1)));debugInterface_1->SetEnableGPUBasedValidation(true);}
First we have to retrieve the Debug Layer interface. Since this is COM object, we will use a function D3D12GetDebugInterface() that returns the interface address of given global identifier. And since it is a COM object, we are not creating it directly and instead we provide the UUID of the ID3D12Debug interface and we will retrieve a pointer to it.
On that interface we will call the EnableDebugLayer() method. When we do that, we will be getting some messages in the Visual Studio “Output” window, in the real time, that would help us investigates problems. It is important to mention that we need to call this function before we create the Device. If we do this after, then the Device we’ve created will be removed.
There is one more Debug Layer that is worth mentioning – the GPU Based Validation. This particular one serves the same role as the one above, but in this case it helps debug the code of the application that run on the GPU – the shaders. It will not be very helpful for us for now, but definitely it will in the future.
Now to enable this layer, we need to call method SetEnableGPUBasedValidation(), but on the ID3D12Debug1. As you know, COM object don’t “inherit” from base objects, but rather “implement” various interfaces. The IUknown interface which is common to all COM objects has a QueryInterface() method. We provide the GUID of the interface we want to obtain as well as the pointer to it of the same type. This method also has to be called before creating the Device.
Now whenever there are some bugs in runtime and you don’t know what is happening, just recompile the code in Debug and look at the Output window – there is a good chance that you will find some useful information in there to help you fix the issue.
Command Queue
Lets pause for a minute and think about what we actually want from our GPU. In a very broad term, we want to prepare a list of instructions on the CPU using the DirectX API functions, we hate to make sure that all necessary resources are present on the GPU, that they are in a proper state, and then submit that list to the GPU and trigger it to execute our instructions to produce and present a frame.
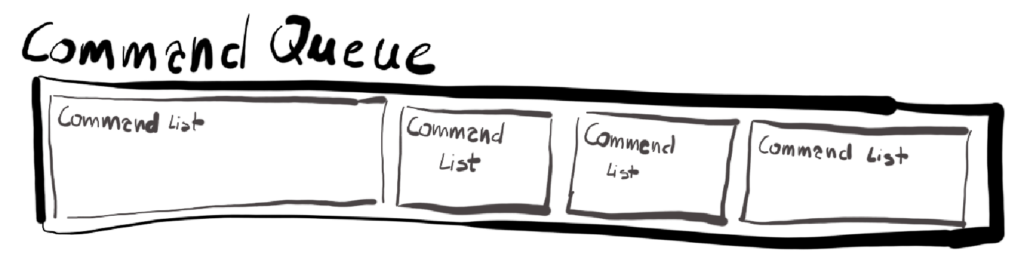
The list of the commands to execute on our chosen GPU in DirectX 12 is kept on the Command Queue. Each Command Queue is associated with DirectX Device. We won’t be putting the commands directly on the queue – we will be putting them via one or more Command Lists instead. Command Queue can contain several Command Lists when submitted for execution.
Before we create our Command Queue on our Device, we need to provide a short description of what we actually want. This scheme will be appearing quite often through this course, so you might as well get used to it.
void Renderer::CreateCommandQueue() {D3D12_COMMAND_QUEUE_DESC commandQueueDesc;ZeroMemory(&commandQueueDesc, sizeof(commandQueueDesc));commandQueueDesc.Type = D3D12_COMMAND_LIST_TYPE_DIRECT;commandQueueDesc.Priority = D3D12_COMMAND_QUEUE_PRIORITY_NORMAL;commandQueueDesc.Flags = D3D12_COMMAND_QUEUE_FLAG_NONE;commandQueueDesc.NodeMask = 0;ExitIfFailed(device->CreateCommandQueue(&commandQueueDesc, IID_PPV_ARGS(&commandQueue)));}
We need to specify four things in D3D12_COMMAND_QUEUE_DESC structure. First is the type of the queue. There are many types of queues that we can create, but for us only three are important: Direct, Compute and Copy.
The type of the queue determines the Command Lists that we would be allowed to commit. During the creation of Command Lists we will specify the same type. Later we will cover in detail each of our three types, but for now though just know this: Direct Command Lists contains immediate commands for GPU to execute using 3D pipeline, Compute Command Lists only contains commands to be executed on GPGPU (General Purpose GPU) pipeline which don’t produce immediate output. Finally Copy Command Lists contain commands strictly related to copying the data around.
The main reason for this division is that if you have high end GPUs there is a good chance that some of those commands can be executed in parallel. For example, you can execute some general purpose computing and at the same time producing frames on the graphics pipeline. There can be even several 3D queues. This is considered the advanced technique though, so we will not be doing this during this course.
Queue priority as well as Flags are not important, so we will leave those with default values. The NodeMask is used to determine on which GPU the Queue will be created. This field only makes sense if you explicitly program for multiple GPUs connected together with something like SLI. Each GPU in this configuration is considered a Node and Node Mask points the GPU to use.
Command Allocator
Modern games, especially when set to Ultra settings on high-end GPUs, may require a lot of commands to be executed on the GPU. Figure x presents a single frame from Cyberpunk (captured with RenderDoc, very useful tool). To produce this particular frame the GPU had to execute almost 30000 commands. That’s quite a lot and that is the reason why in DirectX you will need the Command Allocator to manage the memory occupied by those commands and their parameters. We do it by using Command Allocator.

Simply put – Command Allocator is used to manage memory allocated for Command Lists. You can have more than one Allocator, but we will leave the reasoning behind that for later, it is mostly related to multithreading. For now we will just stick with one. You can have one Allocator for several Command Lists, but there can only be one actively recording List associated with given Allocator at the time.
Each Command Allocator has a specified Command List type, just as the command queue, and it can only work with Command Lists of the same type.
Command Allocators grows linearly, meaning the more commands you add, the more memory it takes. It is possible to free the memory used by Allocator, however, the size of the Allocator does not come to zero – it stays as it was before. In other words, the Command Allocator can only grow, not shrink. It is worth to keep the Command Allocators roughly the same size in order to avoid costly dynamic memory allocations between frames.
void Renderer::CreateCommandAllocator() {ExitIfFailed(device->CreateCommandAllocator(D3D12_COMMAND_LIST_TYPE_DIRECT, IID_PPV_ARGS(&commandAllocator)));}
We create Command Allocator by calling CreateCommandAllocator() function on the Device. There is only one input parameter, the type of Command List that can be associated with our Allocator. In our simple design, we will only have one Command Queue, one Command List and one Command Allocator.
Command Lists
The last thing we will create in this section is going to be the Command List – the actually place where we will be recording our commands to be executed on the GPU. Once you create Command List, it can be executed several times, but we will be recording our commands from scratch at the beginning of each frame.
void Renderer::CreateCommandList() {ExitIfFailed(device->CreateCommandList(0, D3D12_COMMAND_LIST_TYPE_DIRECT,commandAllocator, nullptr, IID_PPV_ARGS(&commandList)));commandList->Close();}
To create new Command List we call CreateCommandList() function on our Device interface. First argument is the GPU node index. We will only be using one GPU, so we set it to zero. Then we specify the type of Command List – this has to be consistent with the type we’ve put in Command Queue and Command Allocator.
Third argument is the Command Allocator that will be managing our Command List memory. Fourth argument is a pointer to Pipeline State Object (PSO) interface. We will not cover this subject for now. We can leave it with nullptr and we will just do that.
Finally, since this is a COM object, we will user our IID_PPV_ARGS macro. Last thing we do is we need to formally close the Command List with Close() function. That formally indicates that this newly created list is not in the recording state.
Professional games usually create several Command List for each frame. Each Command List is usually being recorded on separate thread. That gives a huge boost in performance. This was technically possible in DirectX 11 (although it was harder to achieve), but it was still being serially executed in the GPU driver, so you really didn’t get the parallel execution.
Our engine will be extremely simple. We will only have one thread which decreases the complexity a lot for the cost of sub-optimal performance. Eventually though, we will try to achieve some level of parallelism, maybe in the follow up course.
Performance
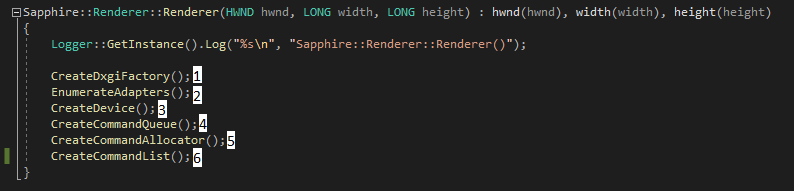
Have you ever wondered how much memory the DirectX objects occupy? We will try to answer this question in this chapter. This experiment was fairly easy thanks to diagnostic tools provided by Visual Studio. I’ve setup breakpoints for every step of the constructor, just like on the figure below.
And below you can find corresponding values as shown in the Diagnostic Tool window.
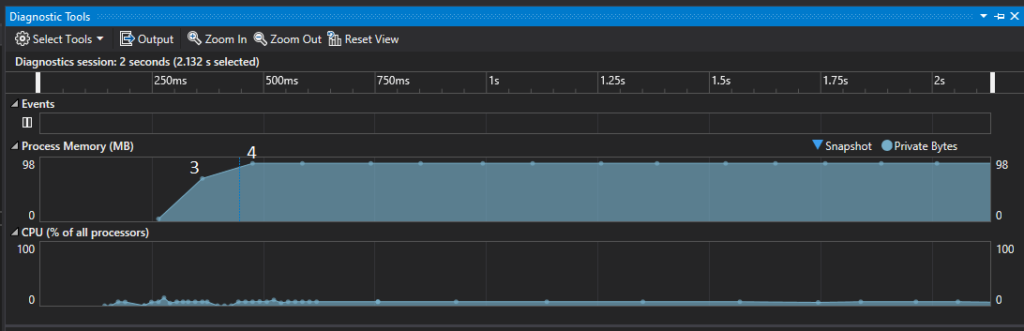
Based on that chart we know that the Device takes about 70 MB of memory and the Command Queue about 20 MB. Our application compiled in Release mode takes up 90 MB.
I’ve run the same experiment but for the Debug version of the application and in that case it used up about 150 MB. As you can see, the Debug gives you a lot of overhead, so it should be mainly used for finding functional issues.
Summary
This chapter was rather short compared to the others, but it is as important as them. This is our first encounter with DirectX. We’ve created the Device which represents the actual GPU that we will be working with. The Device will allow us to create necessary resources and other DirectX object to produce frames.
On top of that, we’ve created a groundwork for the frame presentation framework and GPU work submission in a form of Command Queue, Command Allocator and Command List. We’ve learnt that we will be recording our command on the Command List, adding them to the Command Queue and committing them for execution on the GPU.
We’ve also learnt that Command Lists can grow significantly and therefore they can use a lot of memory. Command Allocator is the object that will manage that memory.
In the performance section we’ve learn that DirectX object can be pretty big, so we’ve included them in the memory layout figure.
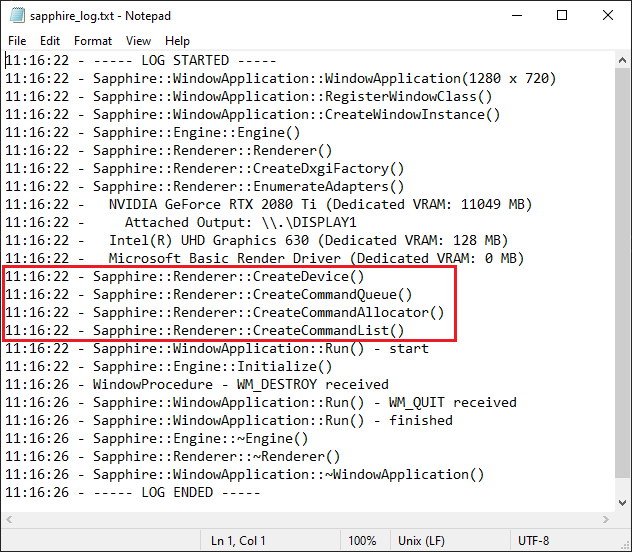
The effects of the work done in this chapter would be mainly visible in the logs. All the DirectX objects added in this chapter has been created successfully.
Visually however nothing changed. We still see the same blank window as we did before.

In the next chapter we will build the groundwork for the frame presentation framework – we will create so called Swap Chain and we will briefly discuss what happens after the engine calls the Present method, effectively triggering frame presentation on the display.
Source code for this part of the course can be found under chapter “CH04” in this repository here: https://github.com/bboczula/GameEngineCourse.git