Introduction
In this part of the course we will create a basic framework for the frame presentation. You can think of this as giving our engine a pulse or a beat. Every beat we will do everything in our power to produce, render and present a single frame on the screen. This beat will be accompanying us throughout our journey. The frame presentation is such an important topic that we will probably spend a lot of time here. This is the foundation of the engine, so it needs to be understood well.
We will implement and handle synchronization between GPU and CPU which is crucial to keep data consistent prior presentation. Finally, we will take a look at VSync – what it is, how this could help with screen tearing and how it can be useful for us. Finally, we will take a loot at a single frame in GPUView and try to see how VSync is actually implemented.
Architecture
Finally we will start doing some refactoring. Namely, we will extract some functionality into the new CommandQueue class. From this point on, the general rule of the architecture would be to wrap up the raw pointers into classes that we will be able to control from the Renderer. The ultimate goal would be to wrap up the raw DirectX entirely and just use the wrappers from the engine.
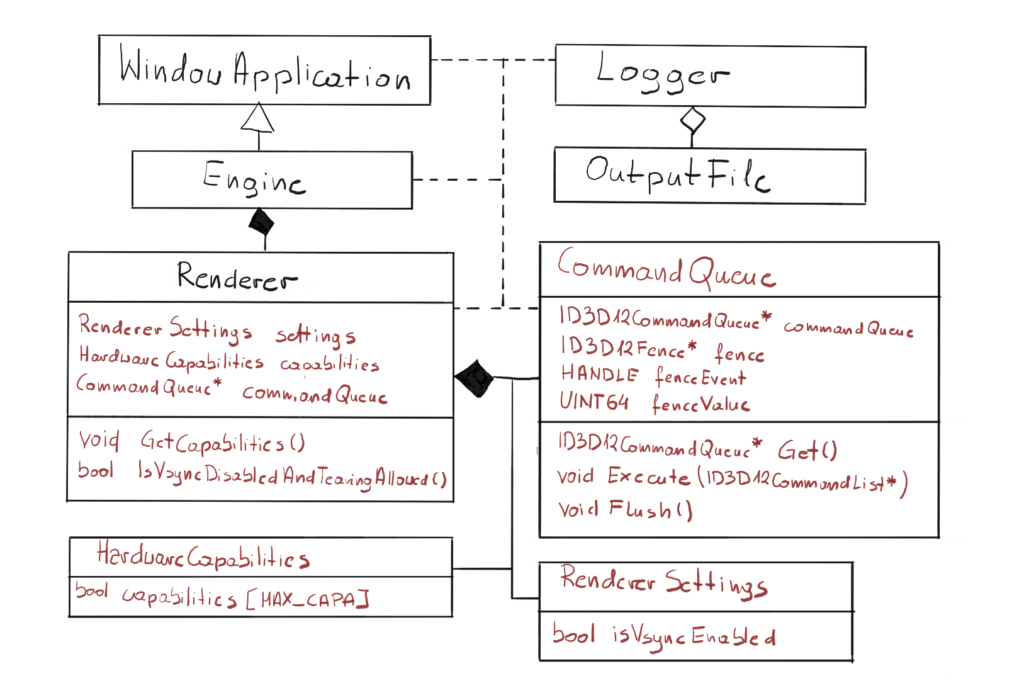
Previously the code responsible for handling Command Queue was a part of the engine. In this chapter, we will introduce the fence synchronization mechanism which really goes hand-in-hand with Command Queue functionality, so that was the reason for extracting both into the new class. Thanks to that change, the synchronization is encapsulated in the newly created class, so from the Engine perspective we will simply call the Execute on the Command List, and Command Queue internally will do what’s necessary to synchronize with GPU.
We have also introduced two new classes, HardwareCapabilities and RendererSettings. The first one will keep all the hardware properties and capabilities on which the Engine behavior depends. We will start with checking if GPU supports tearing to enable VSync. The second one will keep the input parameters for the render. In this chapter we will start with checking if the user wants VSync to be enabled or not.
Frame Generation
Let’s pause here for a minute and consider what needs to be done in order to present a frame on the screen. On the CPU side we have our Command Lists, on which we will record our commands for the GPU to execute. Basically, we will provide the geometry of every object we want to draw, along with textures and other data, and submit it for drawing, maybe setting some GPU states and programs that need to be run in-between. Then, when CPU is done, it will submit that Command List for execution on the GPU. This Command List will be processed by DX runtime first, then passed down to the GPU driver which will translate it to one or more Command Buffers, which GPUs actually know how to execute.
Eventually, that set of instructions will end up on the GPU and GPU will produce (or render) the frame. You can think of a frame as a 2D picture, where each pixel contains the color value. From that point on, this frame needs to end up on the screen. Let’s look at this process with a little more detail. Its visualization can be found on figure 2.
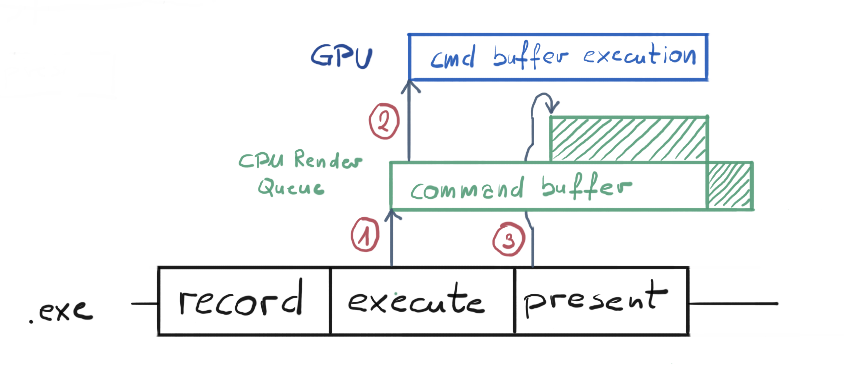
The bottom section of figure 2 represent the work that is being done on the CPU. This is what actually our “exe” file is doing. Every frame we will record commands for the GPU on our Command List. Then we execute our Command List on our Command Queue (1). At that point, our list of commands gets translated by the GPU driver into what we call the Command Buffer. Command Buffer contains instructions that are understandable by the GPU.
This Command Buffer (or buffers) are awaiting for the GPU to execute them on the CPU render queue, which is governed by the OS scheduler. OS by default can schedule maximum of 3 frames in that queue. The rendering process will be halted if it would try to schedule the fourth one.
In this particular case, our Command Buffer is almost immediately being executed on the GPU (2), since GPU is not doing anything, and eventually producing our frame. In the meantime, when execute function returns, our application calls Present() on a Swap Chain, which basically gets translated into Command Buffer too (3). Since our previous Command Buffer is not yet finished, the present Command Buffer were scheduled on top of that and waiting for the spot. Remember, only the most bottom Command Buffer is currently executed.
Frame Synchronization
You can probably notice that CPU and GPU work independently, there are no direct communication between them. When CPU submits the Command List and calls Present(), it is really done. It can theoretically start producing new frame. The problem is data consistency.
We keep our Command List somewhere in the memory, and that memory is managed by Command Allocator. There is this condition that we need to meet – we have to make sure that we won’t erase the memory occupied by our Command List (or reset both allocator and command list) before GPU is finished rendering. This problem introduces the need for synchronization, which is an act of one thing waiting for another thing before moving on.
If we put our CPU thread to sleep until the GPU is done rendering, and only then reset the Command Allocator, we basically guarantee the command List consistency. Figure 3 shows what we are trying to achieve. Fortunately, all of our problems have been addressed and there are solutions to them in the OS.
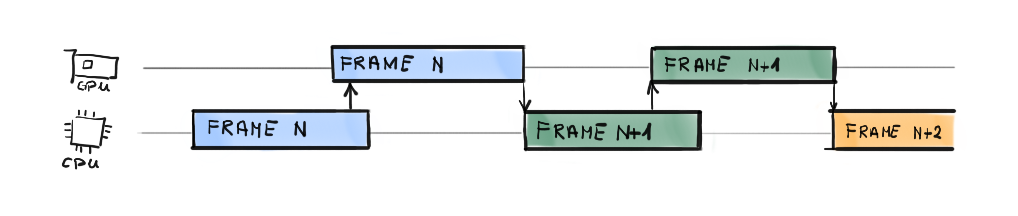
Now please bear in mind that this is not how it works in the professional engines. Waiting for the GPU to finish is a huge waste of both CPU and GPU computation power and performance, so they came up with various solutions to this over the years. For example they render two frames ahead on the CPU, meaning that when GPU is busy rendering frame n, the CPU is preparing the rendering of frame n+1, using the copy of the input data and its own allocators.
So basically what we will be doing is this: every frame we will record our Command Lists for the GPU, schedule it in the Command Queue for execution and wait for the GPU to finish executing that particular Queue before we present and eventually reset the Command List and start doing this all over again. The question remains, how do we do that? Fortunately, this is easier that it sounds with the usage of synchronization mechanism called fence.
Fence
The entire fence mechanism depends on a single integer value. You can set the fence value on the GPU from the CPU side. The GPU will set it as the current fence value as soon as it is done processing whatever is processing. You can also ask the GPU about the current value of the fence at any given moment. If you compare those two values you would be able to say if GPU has done processing the data you submitted before.
The fence value represents a unit of work currently being processed. CPU can update the value of the fence on the GPU side by calling Signal() function on the Command Queue. CPU can also check the fence value at any time. If the checked value is different (usually lower) than the one we set with Signal(), then it means that GPU is not done executing the previously committed Command Buffer yet.
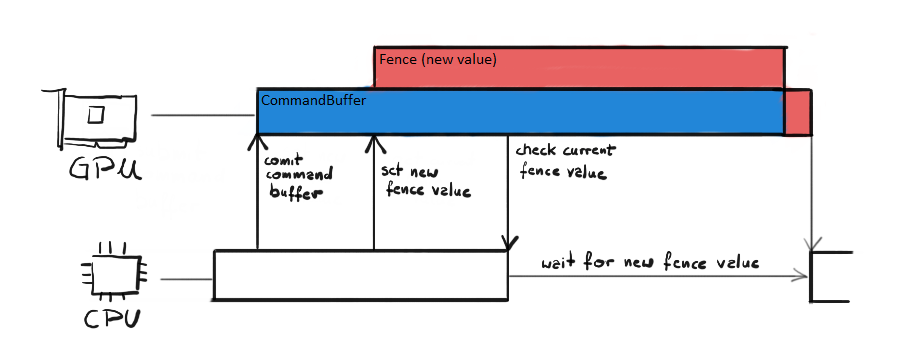
The synchronization using fence is presented on figure 4. First, CPU submits all the Command Lists on the Command Queue, effectively sending the Command Buffer to the GPU. GPU starts executing it. In the meantime, CPU signals new fence value to the GPU. Since GPU is currently doing the work, it schedules setting new fence value for later. That is why the red block was put on top of the blue block (Command Buffer). While GPU is still doing its work, CPU checks the current fence value. If it is lower that the one we have just signaled, that means that we need to wait until it reaches that value. Our thread is put to sleep until that event happens.
Fence Creation
The fence mechanism is represented by the ID3D12Fence interface. We can create the fence by calling CreateFence() function on our Device interface.
void CommandQueue::CreateFence(ID3D12Device* device)
{
  ExitIfFailed(device->CreateFence(
    0, D3D12_FENCE_FLAG_NONE, IID_PPV_ARGS(&fence)));
}
The arguments are pretty straight forward. The first one is the initial fence value. Then we have a flags, but they are not useful for such a simple scenario as ours. Finally we have a typical COM output parameters, so we are using the IID_PPV_ARGS macro.
Event Objects
Now if we succeed with fence creation, we need to create the fence event object. Event Objects are useful in waking up a thread indicating that a particular event has occurred. It is an internal Windows object that is used for synchronization, and in our case, the synchronization with GPU. Event Objects combined with one of the Wait functions provide a useful tool for a thread to wait until a particular event happens and then resume execution.
void CommandQueue::CreateEventObject()
{
  fenceEvent = CreateEvent(nullptr, FALSE, FALSE, nullptr);
  if (fenceEvent == nullptr)
  {
    ExitIfFailed(HRESULT_FROM_WIN32(GetLastError()));
   }
}
We create an event object by calling WinAPI function CreateEvent(). The function takes four parameters: attributes, manual reset, initial state and the name. We only care about the initial state really, we need to set it to FALSE because otherwise the object would be create in the signaled state. The reset of the parameters are set to the default values.
GPU Flush
The act of letting the GPU to finish all its work before putting a new one is sometimes referred to as a flush. It is similar to flushing the pipeline. In general it is rather performance costly operation, but for now we are aiming for simplicity, hence the solution.
void CommandQueue::Flush()
{
  Signal();
  WaitForGpu();
}
So the flush operation would simply set the fence value (or signal) on the GPU to a new, increased value and then hold the main thread until that value is reach. Let’s take a look at those two functions.
void CommandQueue::Signal()
{
  ExitIfFailed(commandQueue->Signal(fence, fenceValue));
}
The Command Queue interface has just a function for that – the Signal() function. It takes two argument, the first is the pointer to our Fence interface and the second is the new value of the fence. This function returns immediately, but it will only change the current GPU fence value once GPU is done processing all committed work.
void CommandQueue::WaitForGpu()
{
  if (fence->GetCompletedValue() < fenceValue)
  {
    ExitIfFailed(
      fence->SetEventOnCompletion(fenceValue, fenceEvent));
    WaitForSingleObject(fenceEvent, INFINITE);
  }
  fenceValue++;
}
In the WaitForGpu() function we do couple of things. First, we check the current GPU fence value by calling the GetCompletedValue() on the fence interface. It returns the fence value set after last completely finished unit of work. To be sure our current unit of work is done, we expect that this value would be lesser than the one we have just signaled. Note that fence value increment happens despite the fact if we got lower fence value on the GPU or not. That is because GPU can be faster than us, meaning it can finish the work and set the new fence value before CPU ask for the current value. So if the completed value is equal to the fence value, that would mean exactly that. In both cases, we need to increment our internal fence value.
Then we need to set which event should be fired when the GPU fence reaches the required value. We do that by calling SetEventOnCompletition(). This function specifies an event that should be fired when the fence reaches a certain value, specified by the first argument. The second argument is our fence Event Object. The first is the value of fence which would trigger the event.
Then we use one of the WinAPI function to hold the current thread and wait for the fence to reach our value – the function WaitForSingleObject(). This function simply waits until provided Event Object turns into signaled state. The second parameter is time out in milliseconds – after that timer expires the function returns. We’ve put the INFINITE value there, meaning we will wait till the end of the world if our event never fired.
Finally, we increase internal fence value, so with the next iteration we use the new value. In this architecture we keep count of this value internally, so we simply start from one and then increment this value every frame. There is a possibility that at some point we will have to keep track of the fence value outside of the Command Queue class, probably when we decide to render two frames at the time. But until then, let’s leave it as is.
The last piece of the puzzle is the Execute() function.
void CommandQueue::Execute(ID3D12CommandList* commandList)
{
  ID3D12CommandList* commandListArray[] = { commandList };
  commandQueue->ExecuteCommandLists(
    _countof(commandListArray), commandListArray);
  Flush();
}
This is the same function as before, but with the addition of a call to a Flush() function. Therefore, from the Engine class perspective we don’t have to worry about the synchronization. We simply call the Execute on a single Command List, and the Command Queue class takes care of the rest. This would work for now, but we will need to change that if we want to move on to some more advanced synchronization mechanism.
VSync
In the last chapter, we have taken a look at the screen tearing problem and we have introduced Swap Chain The Swap Chain is just a part of the solution, the screen tearing can still happen, although it is much less likely. There is however one more applicable solution to help to overcome that – a vertical synchronization or VSync for short.
Each monitor has its frequency, sometimes referred to as refresh rate. At the moment of writing this article, the most popular one is 60 Hz, but the 144 Hz monitors are making their way through to the main stream. The refresh rate simply means how many times per second the monitor is able to draw a new image on its surface. This is a fixed step, so for example for 60Hz monitor every 16 ms, like a clockwork, there is a signal that the screen was refreshed.
Vertical Synchronization is a mechanism that prevents GPU from doing anything to the Front Buffer until the display is done with presenting. Effectively that means, that if it is enabled, no new work is going to be scheduled for presentation until the monitor has done its refresh cycle. It does so internally, by putting the Fence in front of the Command Queue execution. This, combined with the Swap Chain double render buffers, should prevent us from seeing the screen tearing ever again.
VSync has some connotations. The most important one is that it limits the game frame rate to the VSync. Imagine that the game is able to produce the frame faster than 16 ms. With VSync enabled, it would have to wait until the next refresh cycle to present it and continue its work. It it is not able to produce frames as fast, but for example let’s say in 20 ms, it would have to wait for another VSync, so 32 ms on 60 Hz monitor, to present, so it limits you to 60 FPS, even though the game can run faster. So you basically sacrifice the performance in favor of image quality.
In order to support VSync in our engine, we need to make three changes in the code. We are not using the fullscreen option to present frames, we are using the windowed version instead. It seems that by default Windows OS set the VSync on for such applications. In order to overcome this, we need to create the Swap Chain with a specific option.
Allow Tearing
First, we need to upgrade our DXGI Factory to IDxgiFactory5. This interface has a CheckFeatureSupport() function, which would allow us to check if our GPU supports given features. Fortunately, this change only comes down to changing the type of our factory in the Renderer header file.
Second, we need to check if our GPU supports the ALLOW_TEARING feature. Thanks to our new DXGI Factory 5 interface, we can do that easily. To future-proof the engine, we have created a separate function that will collect all the hardware capabilities we need to check.
void Renderer::GetCapabilites()
{
  BOOL isAllowedTearing = false;
  if (SUCCEEDED(dxgiFactory->CheckFeatureSupport(
    DXGI_FEATURE_PRESENT_ALLOW_TEARING, &isAllowedTearing,
    sizeof(isAllowedTearing))))
  {
    hardwareCapabilities.setCapability(
      Capabilities::ALLOW_TEARING);
  }
}
The HardwareCapabilites class is very simple, it keeps the array of bool values. Each Capabilites enum points to an entry in that array. You can set given capability, effectively changing its value to true, or leave it at false.
Swap Chain Change
Next, we have to update the CreateSwapChain() function. If we want to disable VSync in a windowed application, we have to set one additional Swap Chain property.
void Renderer::CreateSwapChain()
{
  (...)
  if (IsVsyncDisabledAndTearingAllowed())
  {
    swapChainDesc.Flags = DXGI_SWAP_CHAIN_FLAG_ALLOW_TEARING;
  }
  (...)
}
So if we reqested VSync to be disabled and our hardware allows tearing, we have to set the Flags member to ALLOW_TEARING. Without this property, we won’t be able to call Present() with VSync disabled.
bool Renderer::IsVsyncDisabledAndTearingAllowed()
{
  return !settings.isVsyncEnabled
    && hardwareCapabilities.getCapability(
    Capabilities::ALLOW_TEARING);
}
The IsVsyncDisabledAndTearingAllowed() function checks for those two parameters. If any of the two options are false, then the entire function returns false. This is not the most elegant solution, but I think for now this is fine.
Calling Present
The final change we need to do is in how we call the Present() function, depending on the VSync option.
void Renderer::PresentFrame()
{
  if (IsVsyncDisabledAndTearingAllowed())
  {
    ExitIfFailed(dxgiSwapChain->Present(0,
      DXGI_PRESENT_ALLOW_TEARING));
  }
  else
  {
    ExitIfFailed(dxgiSwapChain->Present(4, 0));
  }
  currentFrameIndex =
    dxgiSwapChain->GetCurrentBackBufferIndex();
}
The Present() function takes two parameters. The first is a so called sync interval. This value simply says to which VSync tick to synchronize. If we set it to zero, this means present the frame as soon as possible and ignore the VSync. This is where we do if VSync was disabled (or tearing is not allowed). If we set it to the value from 1-4 range, that means present aftert n-th tick. Normally this should be set to 1, but we set it to 4, because this would help us to better notice the results of our work in the next chapter.
Second is the flag. There are couple of options available, but for us the most important one is the DXGI_PRESENT_ALLOW_TEARING. We need to set it if we want to avoid VSync in windowed mode.
Performance Corner
In the performance corner we will look at how the engine works at the moment. On the figure below you can see a snippet from the GPUView capture, representing a single frame with VSync enabled.
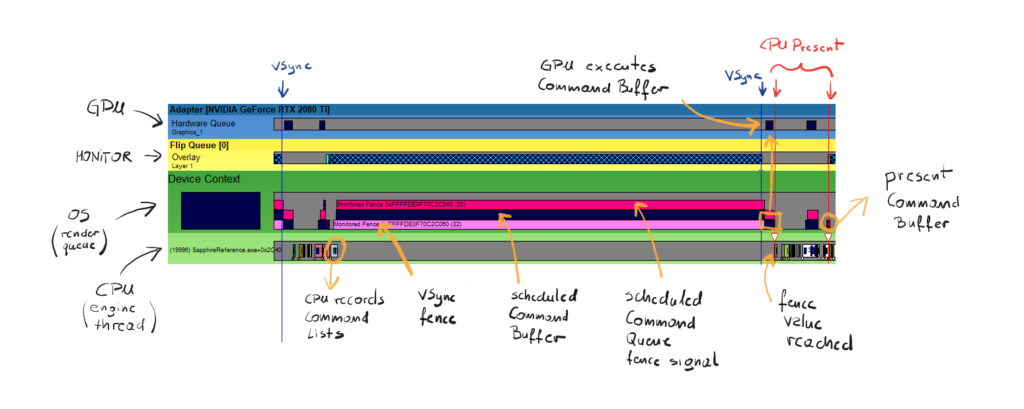
First, let’s try to read what we see here. The green stripes represent the CPU part of frame generation, the yellow one represents the flip on the monitor and the blue stripe represent the GPU. Every box that is at the bottom of each stripe means that this work is begin currently executed. Every box that is on top of the other box means that the work has been scheduled and awaits the execution. Every blue vertical line represents VSync tick and the red vertical lines represent the start and stop of the present procedure (yes, it is a procedure).
We start to read this from the left blue VSync line. First, the CPU starts producing the frame. For now, there is really not much to do, we are just closing the Command List, co CPU finishes quickly. Then we move up to the second green stripe – this is the work scheduled for the GPU execution. It basically sits there until GPU is free to proceed.
The first Command Buffer is the bright pink one. This is a Fence that is meant to halt the GPU until the next VSync tick happens. On top of that, our engine schedules our empty Command List, converted to the Command Buffer. Then, our engine schedules the dark pink Command Buffer – that is our signal, that is the fence value that we want to update GPU with. As you can see, this is scheduled early and still waits until the GPU Command Buffer finishes.
Right after the GPU is done with its work and updates the fence value, the CPU thread is done waiting and proceeds with its work. Again there is not much to do, except calling the present, and that is what our engine to. As you might noticed, the Present is also translated into the Command Buffer and scheduled by the OS. One tiny detail, you might see another small piece of GPU work scheduled and executed before the present. That is the work that needs to be done in order to present, like for example DWM composition.
Summary
And there you go – our engine just came to life and has a pulse. This puts the engine into the rhythm, the beat, where every beat we will be doing all that’s necessary to present the frame.
We had to handle the synchronization between GPU and CPU in order to protect the Command List date before we are able to clear the memory it occupies. We have also implemented a way to either enable or disable VSync, which also could help us with the screen tearing effect. We will use the VSync to actually be able to see the effect of our work, since there is really not much to do and it would be hard to notice.
Finally, we have discussed the GPUView snippet that represents the frame. This is really crucial part for every engine developer. GPUView is a really useful tool for performance debugging and analysis.
Now, we finally see a change in the way our window look. It might not look amazing yet, but it really is.
It might look like a black screen, but in fact what you are really looking at is the Render Target that was created by along with Swap Chain. So you are really literally looking at our canvas. It so happens that every pixel contains all the zeros, as it was create, we haven’t touch any of those pixels yet. Now the only thing that’s left is to fill this canvas with pixels 🙂
In the next chapter we will put our frame presentation backend into a good use. We will start recording some commands and the GPU will actually execute them. We will also implement one tiny detail, so we would be able to see both of our Render Targets, not just one. Exciting time ahead of us, so I won’t take much more time and let’s follow up to the next chapter.
Source code for this part of the course can be found under chapter “CH06” in this repository here: https://github.com/bboczula/GameEngineCourse.git