Introduction
This chapter will be rather short, but also one of the most useful ones. We will move from having console-based application towards windows only application, and on top of that we will implement a logger. The logger will allow us to put some information in a text file, as well as at the output window of Visual Studio. This is one of the most useful features, especially during the development. We will introduce a concept of a singleton and we will see how to open a file and write something to it.
Architecture
There are couple of requirements for our logger. It has to be easy to use, but it also has to be useful. We would like to log string messages, but also numbers and possibly be able to format them the way we want to. It would be great if we could log using the printf() formatting, that would give us a lot of flexibility.
Since we will be only using the logger for this project, the configurability is not really important. In professional projects, there is usually a lot of options, for example an option to have possibility to create many log files. We will stick to a single output file and we will overwrite it all the time. In our case we want simplicity over flexibility.
Since it is important to get the ability of instant feedback, we will allow to print some log messages directly in the Output window in the Visual Studio. We don’t necessarily want to open the log file every time we run the applications, sometimes we would rather have all necessary information visible during runtime.
To fulfill the requirement of being available everywhere, we want to make this class global. This however would introduce the situation where you could have several logger instances, while we only want one. This is where one of the most well known design patters comes handy – the Singleton. Singleton makes sure that there is one and only one instance of given class, which fulfils the requirement of having only one Logger and one OutputFile.
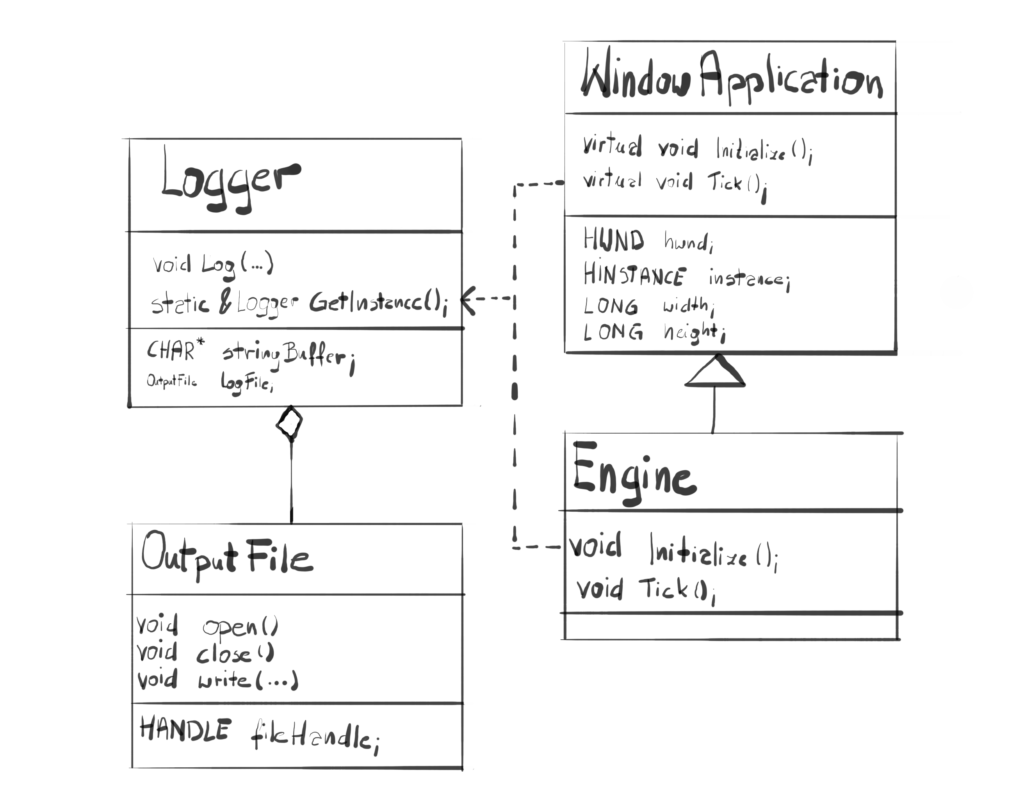
The final architecture at this point is that our Logger class would be a globally available singleton, and it will be using the OutputFile class. The OutputFile class would be only responsible for handling the output file. It will allow the user to open the file, write some data to it and close it. It would be decoupled from Logger in a way that technically the user would be allowed to use it to write whatever kind of data possible, for instance a bitmap.
There are many shortcuts we took and many functionalities that we didn’t implement, but the goal of this course is to get you excited about game engine programming, not to give you the academic knowledge. I want you to have something on the screen as fast as possible, see how exciting it is, get to know the downsides of the implementation and leave you wanting to write more code and add more new features.
Logger Class
Lets take a look at the Logger interface first.
#define STRING_BUFFER_SIZE 1024

class Logger
{
public:
    void Log(LPCSTR format, …);
    static Logger& GetInstance();
    Logger(Logger& other) = delete;
    Logger& operator=(const Logger&) = delete;
private:
    Logger();
    ~Logger();
    OutputFile logFile;
};
At the first glimpse, this looks like a casual class. If you look closer though, there are couple of interesting things happening here. First you might notice that the Log() function has three dots as one of the arguments. Second, you might notice that the copy constructor and assignment operator have a ‘delete’ keyword next to it. Finally the constructor and destructor for Logger class are private. We’ll look closer at all those things one thing at the time.
Singleton
Singleton is a design pattern that makes sure that there is one and only one instance of given class. There are couple of things that we can do to ensure this. First of all, we have to make the constructor private. Therefore the user can’t create an object of that class. Whenever the user would like to create new object, the constructor will not be accessible and the code wouldn’t compile. We will create this object a little bit differently than usual.
The explicit constructor is not the only way to create object. You can also call a copy constructor and you could call an assignment operator. The delete keyword in C++11 is the common idiom of “prohibiting” usage of a function, expressed directly. In this case – by deleting those two functions – we are explicitly saying that copying this class is prohibited. Therefore, since there is no way to call the constructor either explicitly or implicitly, there is no way to create an object of this class.
So far we were doing everything to make it impossible to create the object by the user – its high time we think of a way to actually create our one and only instance. There are many ways to do that, but we will go for simplicity – we will create a static local variable of the type Logger. By doing this we are not only making sure that there will only be one instance of the class, but also we took care of storing it. We will create and access our static Logger instance in GetInstance() function.
Logger& Logger::GetInstance()
{
  static Logger logger;
  return logger;
}
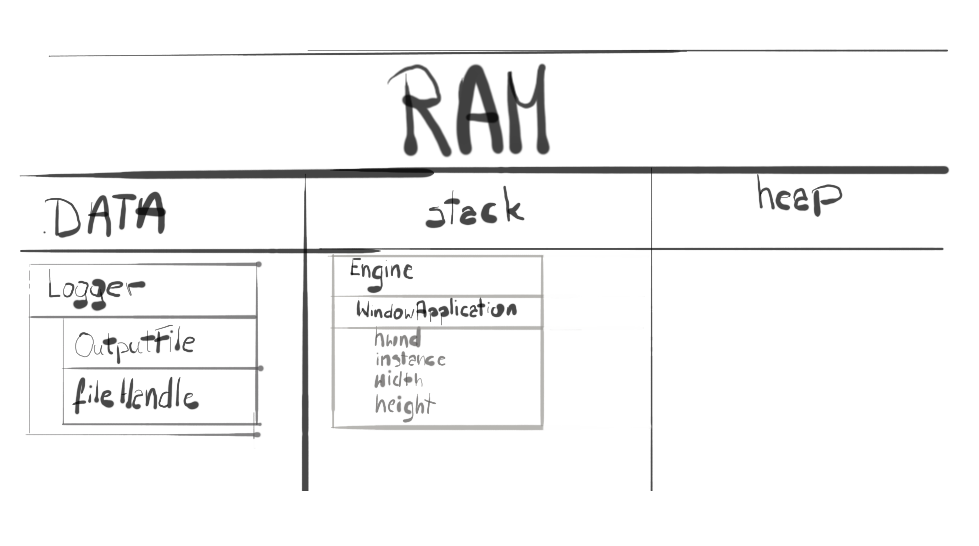
Lets review what are the properties of a local static variable. Those kind of variables are not stored on the stack, nor on the heap – they are stored in a data segment of the executable file (fig. 2). Data segment is where initialized static variables are stored. Initialized static variables are either global variables or static local variables. This data is globally accessible and its value can be changed.
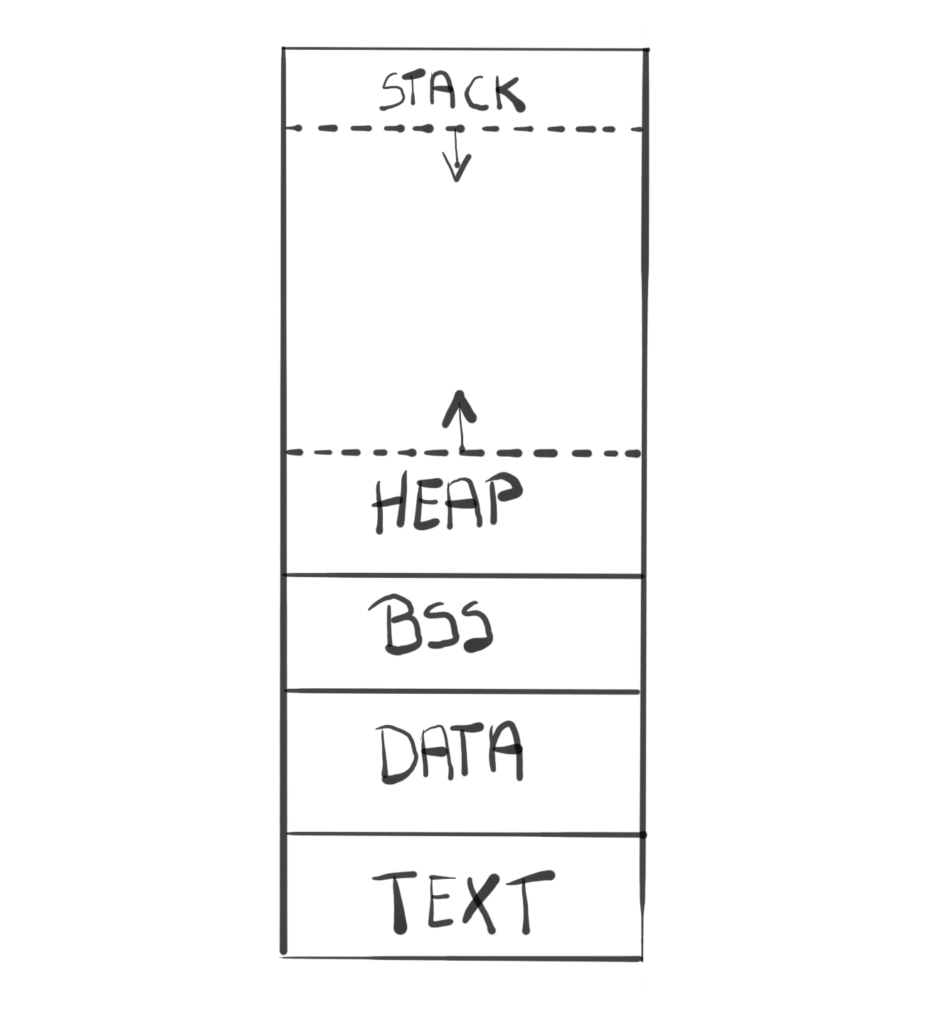
| When the OS loads your program into the local memory, it has a specific layout for it. Text, also known as code segment, contains all the programs’ instructions. Data segment contains any global or static variables. BSS, also known as uninitialized data, contains all global and static variables, that don’t have explicit initialization code. Heap is a memory pool available for the program to dynamically allocate. Finally Stack is a structure used for various purposes, like storing local/automatic variables or storing return address of the function. |
Another property of static local variables is that they begin their life when program begins, and finish it when the program ends. This exactly what we want – the Logger and the output file should be available throughout the lifetime of the program.
The proper initialization though happens the first time when the function that contains the local variable is called. This is where the class’ private constructor gets called and initialization takes place. After that, every time we call GetInstance() function it will return our instance. The destructor is called at the very end of the program.
By now you probably figured that we will be retreiving our only Logger instance function by calling GetInstance() function. Let’s discuss this one a little. First of all, this function has to be static. The reason for that is that there will never be an object that we could potentially call this function upon. It has to be independent of any particular objects of the class, which is exactly what static functions do.
To access static member function, you have to type the class name followed by a ‘::’, followed by the function name. Below you can see an example of the usage of GetInstance().
void Engine::Initialize()
{
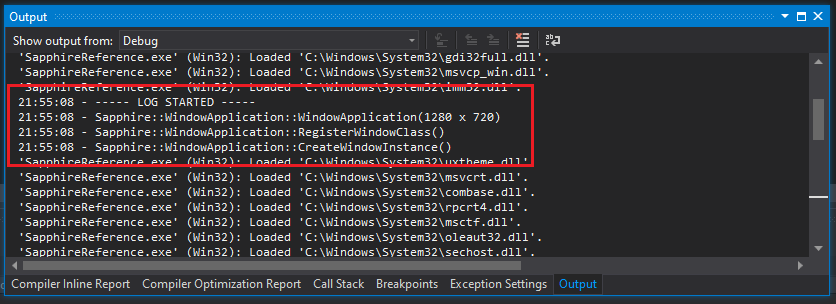
Logger::GetInstance().Log("%s", "Sapphire::Engine::Initialize()\n");
}
There it is. It is simple and convenient. We don’t have to care too much about anything, this class takes care of its own initialization, and we don’t have to care about its scope, since it is the same as the programs scope.
Constructor and Destructor
Now that we know when the constructor and destructor of static local variable gets called, lets have a look at what they do.
The constructor of the local static variable is called the first time the function – in our case GetInstance() – gets called. By the time we call this function, we would rather have our output file opened, and this is exactly what we are doing. On top of that, we simply log that fact in the file.
Logger::Logger()
{
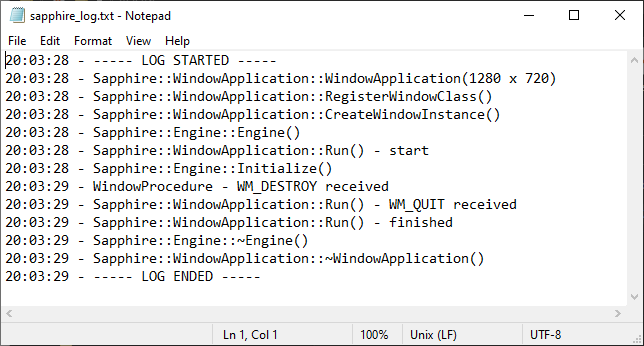
logFile.Open("sapphire_log.txt");
Log("%s", "----- LOG STARTED -----\n");
}
And what about the object destruction? When the program ends, first we log the fact that we are closing the file, and then we close the file.
Logger::~Logger()
{
  Log("%s", "----- LOG ENDED -----\n");
  logFile.Close();
}
I’ve decided to decouple the OutputFile from the logger and this is one of the reason why. Isn’t it convenient? We simply say that we want to open and close the file, and let the OutputFile do the rest. We can alter the behavior based on the operating system, or change it for any other reason.
This is in accordance with so-called Single Responsibility Principle – the class shouldn’t have more than one reason to change it. Logger is not going to change if we decide to change the way we are handling files.
Logging Function
Now lets take a look at the main function of our class. We know for sure that we have our log file opened, let’s create a line and log it to a file.
void Logger::Log(LPCSTR format, …) { CHAR messageBuffer[STRING_BUFFER_SIZE]; va_list variableArgumentList; va_start(variableArgumentList, format); int numOfWrittenCharacters = vsprintf_s(messageBuffer, STRING_BUFFER_SIZE, format, variableArgumentList); va_end(variableArgumentList);tm newTime;time_t currentTime = time(nullptr);errno_t errorNumber = localtime_s(&newTime, ¤tTime);char lineBuffer[STRING_BUFFER_SIZE];int numOfDataToWrite =sprintf_s(lineBuffer,STRING_BUFFER_SIZE, "%.2d:%.2d:%.2d - %s", newTime.tm_hour, newTime.tm_min, newTime.tm_sec, stringBuffer);OutputDebugStringA(dataToWrite);logFile.Write(dataToWrite, numOfDataToWrite);}
This function does three things. First, it will create a formatted string, based on the input parameters. This is a classic printf() formatting. By using variadic function macros, like va_list, va_start and va_end, and by using the function vsprintf_s(), in our string buffer a formatted null-terminated string will show up. It basically a wrapper for vsprintf_s() function, we are just bypassing whatever the user wants to log.
The vsprintf_s() function stores the output null-terminated string in a buffer. I’ve decided to make this buffer local and of fixed size. Initially I was warrying about the allocation time, but the truth is that allocation on stack – which is where local variables live – is very easy, it is simply increasing the stack pointer. I don’t expect this function to be called too many times, so really it is not worth the hustle. The only downside is that potentially it might cause stack overflow. I don’t want to spend too much time on this, since it is a hobby project of mine, so just be aware of that and lets move on.
On top of the string to log, we also want to add a timestamp. Very often this can give us more information, especially when we will be facing performance problem. To get the current time, we will use time() function and localtime_s() function. The first function returns the time that has passed since 00:00 hours, Jan 1, 1970 UTC. This value is not really useful, so we will use the second function to translate it into calendar time. We use the output of that in the sprintf_s() function to produce the final line.
The sprintf_s() function returns the number of generated character, which we need to know how many bytes to write to a file. Before writing to a file though, we are calling the OutputDebugStringA() function. This function, among other things, print messages in the Output window in Visual Studio (View->Output or “Alt+2”), providing instant feedback.
The last thing we do is we write our generated null-terminated string to a file.
OutputFile Class
Finally lets have a look at the OutputFile class. I limited its functionality to the minimum for now – we would only be able to open the file, write some data to it and close it when we’re done. In the future we will be implementing reading some data from files, so we will probably have to revisit this architecture, but for now this should be enough. I am a big believer in the idea of getting something to work fast, and then iterate over it, improving it over time.
class OutputFile
{
public:
  OutputFile();
  ~OutputFile();
  void Open(LPCSTR fileName);
  void Close();
  void Write(LPCVOID data, DWORD size);
private:
  HANDLE fileHandle;
};
The interface is basically wrapping up the WinAPI funcitions, hiding some of the implementation details from the developer. The only data that we keep is the handle to the file. It is received during file creation and used to close the file. I’ve decided not to open the file in the constructor and close in the desctructor, I wanted to leave that responsibility to the class that will be using it.
Opening and closing a file
Let’s take a look a the Open() function.
void OutputFile::Open(LPCSTR fileName) { fileHandle = CreateFileA(fileName, GENERIC_WRITE, 0, NULL, CREATE_ALWAYS, FILE_ATTRIBUTE_NORMAL, NULL);if (fileHandle == INVALID_HANDLE_VALUE){MessageBox(NULL, L"Unable to open file!",L"File Error", MB_OK | MB_ICONERROR);exit(1);}}
We’re using the CreateFileA() function, mainly because it takes LPCSTR as a file name, and we’re not using “wide character” setting (more about that a little bit later). This functions simply opens up a file. It returns a handle to that file, which we are storing. This handle is then used to access this file.
| The way of storing a string is a pretty complicated one. Back in a day, it was very popular to store then as so called “null-terminated string” or a “C string”. It is simply an array of chars, where the last element is null. So in order to store this kind of string you need a buffer – an array that is at least as big as the string. The null character at the end is used to check the boundary of the string. The LPCSTR type is simply a const pointer to an array of CHARs. |
There are many parameters to that function, but for now we will inspect just some of them. First is the file name in a form of null-terminated string. Then we point out that this is a file that we want to write to by providing GENERIC_WRITE. We also pointed out that we want to always overwrite the file (CREATE_ALWAYS). We could have just append new logs to the end of file, but in our case this would only make this file less readable.
There is a simple check if the file was successfully created. If not, then we simply terminate the application. This might be to harsh, we could have checked the reason for that or simply not create the file, but in this course we aim for simplicity, so we treat most of our errors as fatal.
Closing a file is really simple. We just call an WinAPI function and prividing a handle we stored when opening a file.
void OutputFile::Close()
{
  CloseHandle(fileHandle);
}
The basic functionality is done. Now we would like to be able to write something to that file.
Writing to a file
Writing to a file using WinAPI function is also pretty simple, but it would require a little bit more of error handling.
void OutputFile::Write(LPCVOID data, DWORD dataSizeInBytes) { DWORD bytesWritten = 0; BOOL errorFlag = WriteFile(fileHandle, data, dataSizeInBytes, &bytesWritten, NULL);if (FALSE == errorFlag){MessageBox(NULL, L"Unable to write to file!",L"File Error", MB_OK | MB_ICONERROR);exit(1);}else if (bytesWritten != dataSizeInBytes){MessageBox(NULL, L"Unable to write entire string!",L"File Error", MB_OK | MB_ICONERROR);exit(1);}}
In order to write to a file, we are using a WinAPI WriteFile() function. It has the following parameters.
- Handle – a handle to a file where we want to write to
- Buffer – a pointer to a buffer containing the data we want to write to a file; it’s of the void* type, so it is not dependent on the type of data; it’s just a stream of bytes
- Number of bytes to write – a number of bytes to write to file
- Number of bytes written – output parameter, it is the number of actually written bytes; used for error checking
- Overlapped – we are not using this, this is to support byte offsets
The Write() function is general. It doesn’t matter what kind of data we want to write to a file. The LPCVOID type is a void pointer, so basically a raw pointer. That’s why we need the size of data we want to write. This is the size in bytes, and since one char is one byte, if we want to write a string, the size in bytes is the actual size of the string.
The function returns bool value. If it is false, the we know that something went terribly wrong and we terminate the application. If the function returns true, there is still one possible error. If the number of bytes requested to write to a file is different than the number of bytes actually written. As with most of our errors, we treat this one as fatal and we terminate the application.
We are using this class to open a file to put our log messages in, but in fact we could use it in any kind of scenario, for example if we wanted to say output a screenshot in a bitmap file format. We will probably need to revisit the I/O class architecture, but for now it should suffice.
Performance
We will have a look at the GPUView trace from our application. This tool is a very complicated one (until you learn how to use it). I’m not going to go into details how to collect the logs and such, we will just take a look at what it offers and what we can learn about our application.

At the top we can see the name of our executable. This is also the name of a process. I really like the definition you can find in “Windows Internals” book – a process is container for a set of resources used when executing the instance of the program. That set of resources, among others, consist of the following.
- Executable program
- Private virtual address space
- Process ID
- At least one thread of execution
So when we start our game, all this and a little bit more is given to us by the operating system. The number just in front of the process name is the process ID. Below that there is one line. That line represents a thread. The thread also has its ID as well as the thread name if it was given during complication. We haven’t done that yet, so instead we have the address of the main thread function.
The executable program is mapped to the virtual address space, exactly like it was presented in figure x at the beginning. Each “section” of the file is given its own address. A virtual address space is a very interesting and complicated subject. Without going into details, it is kind of a map where each virtual address corresponds to an address in a physical memory. It has many different purposes, for example it would allow you to be able to reference way more memory than your actual physical memory. At some point in the future we will dig into this subject a little bit more.
Last thing I wanted to mention – you might notice that our thread in a GPUView log consist of many colorful rectangles. Each rectangle represents a little amount of work being done on the CPU. In our case, this is most probably the code responsible for message handling. Each color represent a different logical processor that executed that bit of code. It is interesting to see that our thread is not bound to one particular core. Instead, it jumps from core to core, which is govern by so called scheduler. Just take a mental note on that, we will go back to this subject later in the course.
Summary
And here it is – our Logger is ready. It will allow us to log many useful information. It would be especially useful until we implement visuals and maybe user interface. We used a singleton design pattern to make sure that our Logger is globally available and there is only one instance of it. We’ve decoupled the implementation of the OutputFile to increase readibilty and lower the maintanence of the code (SRP, Single Responsibility Principle). Now we are able to read our logs from the text file.
Last but not least, let’s see what do we have in the memory at the moment. We didn’t add much to the code, except Logger and OutputFile classes. Since our instance of Logger class is a static local variable, it is entirely stored in static area of the mapped file.
In the next section we will start building the rendering part of the engine. We will try to discover the GPU, check its capabilities and maybe create our first DirectX object. We will use our new logger to log some interesting information to the file.
Source code for this part of the course can be found under chapter “CH02” in this repository here: https://github.com/bboczula/GameEngineCourse.git