Introduction
A window is a visual representation of the application that can present something to the user and handle user input. The simplest window consists of the client area and the window bar. The client area is the canvas on which our game engine will be presenting frames.
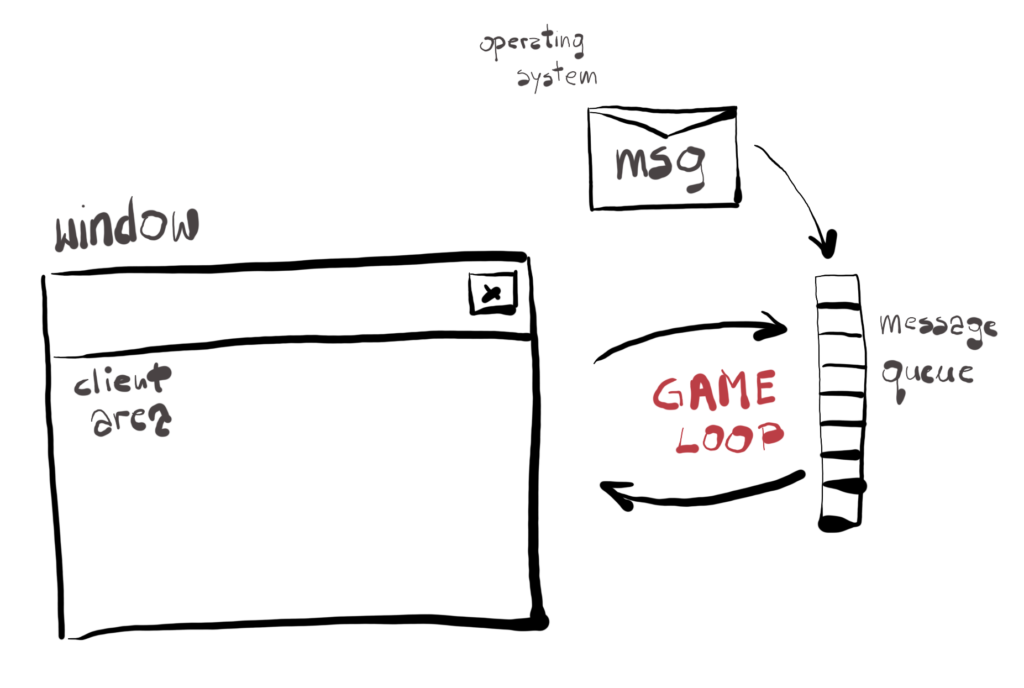
Windows operating system communicates with windows applications by sending them messages. Messages are simple data structures with the ID that lets you uniquely identify it. They represent many real time events, like “the mouse was moved”, “the key was pressed”, “the window lost focus” or “the user closed the window”. Most events have some data associated with it, for example “the mouse was moved” message also carries the information about the current mouse position.
Each window application contains a message queue on which the operating system is placing its messages when an event occurs. In order to handle them, the application runs an infinite message loop and during each iteration it checks if there are any messages there.
This loop is also very useful for the game engine – we can use it as a game loop. The game loop is also an infinite loop. During each iteration the game engine does whatever is necessary to produce a set of instructions for the GPU to execute, which in turn will render a frame and present it on the window’s client area.
Architecture
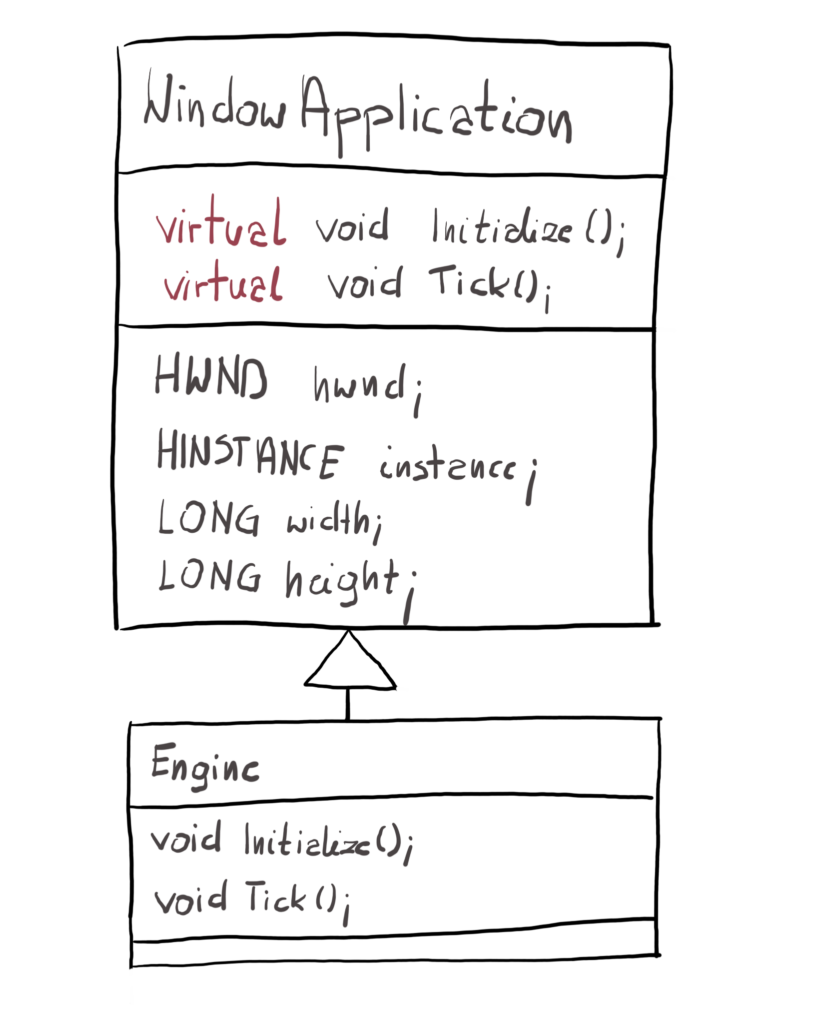
The idea here would be to separate window creation and message loop from the engine related functionality. WindowApplication class will take care of the first part while the Engine class would take care of the second. The Engine will inherit from WindowApplication and will implement its own version of the Initialize() and Tick() functions. Thanks to the polymorphism mechanism, those would be the ones called in the Run() method. The relationship between Engine and WindowApplication can be described as “is-a” – you can say “Engine is a Window Application” and in this architecture it is correct.
| The polymorphism mechanism would call different member function based on the type of the object it was invoked upon. If you call the Run() function on the object of the Engine class, the methods Initialize() and Tick() implemented in that class would be called instead of the ones from WindowApplication class. |
The Initialize() would be called right before the first iteration of game loop, giving a chance to do all the memory allocations and initializations, while Tick() would be called every iteration of the loop, giving us opportunity to produce a frame and push it to the GPU.
Remember that this engine is a really simple one and it is a far cry from any even semi-professional ones. The idea behind this course is to introduce you to the topic of game engine programing, computer graphics and rendering, and to show you how amazing that is leaving you wanting more.
Window Application Class
Before we start producing frames, we need to create the window and make the operating system aware of it. We will create a class to encapsulate window’s creation and message loop. The only input parameters are the requested width and height of the display area. Usually when you run a game, you are able to set its resolution and this is the simple version of that process. In our simplified engine the user will only be able to set this during compilation – in a professional engine the user potentially can change the resolution even during gameplay. Based on that input we will know exactly how big our client area should be. Let’s look at the class interface.
class WindowApplication
{
  public:
    WindowApplication(UINT width, UINT height);
    ~WindowApplication();
    void Run();
  protected:
    virtual void Initialize();
    virtual void Tick();
    void RegisterWindowClass();
    void CreateWindowInstance();
    HWND hwnd;
    HINSTANCE instance;
    LONG width;
    LONG height;
};
As per the architecture, two methods are virtual – Initialize() and Tick(). All the data is protected, meaning when the Engine class will inherit from this one, they will become private and not available outside of it.
Constructor
The constructor is divided into two separate functions, simply to improve readability. By using the initialization list we will store the width and height within the class, so they would be available throughout the life of the program. The hwnd and instance members will be set to NULL and will be filled during the constructor execution. Those two are very important and by doing that we ensure that they are ready when the Engine class calls its constructor.
WindowApplication::WindowApplication(UINT width, UINT height)
  : width(width), height(height), hwnd(NULL), instance(NULL)
{
  RegisterWindowClass();
  CreateWindowInstance();
}
First, we need to register a so-called window class in the operating system and after that we need to create window instance. After that, the constructor will finish and all our variables would be filled with correct values.
Register Window Class
Window class is simply a set of window attributes, like associated function that will handle messages or window appearance properties. Window class can be shared by many windows by using its name. Keep in mind that a “window” in WinAPI is a very broad term – a button or menu is also considered a window. With this approach, many windows can use the same properties.
I just wanted to point out that WinAPI “Window Class” is something different than C++ “Window Class” although the meaning of both is correct.
#define WINDOW_CLASS_NAME L"SapphireMyWindowWin32Class"

void WindowApplication::RegisterWindowClass()
{
  WNDCLASSEX windowClass;
  ZeroMemory(&windowClass, sizeof(WNDCLASSEX));
  windowClass.cbSize = sizeof(WNDCLASSEX);
  windowClass.lpszClassName = WINDOW_CLASS_NAME;
  windowClass.lpfnWndProc = (WNDPROC)WindowProcedure;
  windowClass.hInstance = instance;

  ThrowIfFailed(RegisterClassEx(&windowClass));
}
There are many more things we can setup, like the application cursor or icon, but this is the absolute minimum set of properties to get the window running.
First, we need to set the size of the structure. Then we set a window class name, which is simply a string defined earlier and we will use it also during window creation. This name allows to uniquely identify the window class. For convenience we’ve stored this name as a compiler constant.
Then we need to set the address of the window procedure and finally the window instance handle. Window procedure is a function we will implement in a second that will handle the messages from the queue.
Instance handle lets us uniquely identify each executable or DLL. If you run two instances of our program, each will get its own instance handle. In order to get the instance handle of they currently running executable, we are calling the GetModuleHandle() function with NULL as the parameter. We store the return handle in the initialization list in the constructor.
The window class registration is done by calling RegisterClassEx() function with an address to our window class definition structure. Now it is registered in Windows operating system, and you can refer to it by using its name. Registered window class is necessary to create a window.
Handling Errors
You might notice that we are using the ExitIfFailed() function wrapped around RegisterClassEx(). Many if not most of the windows functions uses the HRESULT as the return type. The return value of those functions usually indicate that there were some problems during the execution. It is necessary to check those values and handle them somehow.
The ExitIfFailed() function provides simple error control mechanism. The macro FAILED returns true if HRESULT indicate error. Our mechanism will simply show a popup window with some message, wait for user to click “OK” and then simply exit the program.
There is a helper class _com_error that encapsulates the HRESULT error code handling. It has a helpful function ErrorMessage() which is something that we want to present to the user via message box. In the constructor of the object we simply pass the HRESULT value which is the result that our function returned.
#include <Windows.h>
#include <comdef.h>

inline void ExitIfFailed(HRESULT hr)
{
  if (FAILED(hr))
  {
    _com_error error(hr);
    MessageBox(NULL, error.ErrorMessage(), L"Error", MB_OK | MB_ICONERROR);
    exit(1);
  }
}
This mechanism is a really simple one – if something went wrong, we simply notify the user and shut down the application. Maybe at some point we will try to handle those errors better, but at this point this is more than enough.
Window Procedure
When there is a message on the message queue, we can process it – the function that is responsible for that is called a window procedure. We provide the address of this function to the window class, so the operating system knows exactly where to route the message associated with given window. Usually this function contains a big switch statement with various message IDs that you want to handle and appropriate procedure for each message.
LRESULT CALLBACK WindowProcedure(
  HWND hwnd, UINT msg, WPARAM wParam, LPARAM lParam)
{
  switch (msg)
  {
  case WM_DESTROY:
  {
    PostQuitMessage(0);
    break;
  }
  }
  return DefWindowProc(hwnd, msg, wParam, lParam);
 }
Window Procedure has four parameters: a window handle of the window that this message relates to, message ID and the parameters associated with the message divided into two variables – wParam and lParam.
For our purposes, we only have to handle one message to be able to terminate our application and close the window – a WM_DESTROY. It is sent to the window procedure of the window that is being destroyed after the window is removed from the screen. This event happens after user clicked the “close window” button or pressed “Alt+F4”.
As a response to WM_DESTROY message, we call the PostQuitMessage() function. This function posts the WM_QUIT message to the message queue. When the application receives this messages, it is an indication that it should stop the message loop and exit.
Now you may wonder, where do we handle the WM_QUIT message, since it is not present in the window procedure. As we can read in the documentation, the WM_QUIT message is not associated with a window – its window handle is set to null – and therefore it will never be received through a window’s window procedure. Instead it is retrieved only by PeekMessage() and GetMessage() functions. We will handle that in the message loop.
If we receive any other message, we let the Windows handle it. We are simply bypassing the original message to the DefWindowProc() function. It calls the default window procedure which doesn’t do much except making sure that every message is taken care of.
Create Window Instance
The window class registration is required before we actually create our window. With that out of the way, we can move on and do just that.
#define WINDOW_CLASS_NAME L"SapphireMyWindowWin32Class"
#define WINDOW_TITLE L"SapphireEngine"
#define DEFAULT_WINDOW_STYLE WS_VISIBLE | WS_CLIPCHILDREN | WS_OVERLAPPED | WS_CAPTION | WS_SYSMENU | WS_BORDER

void WindowApplication::CreateWindowInstance()
{
  RECT windowRectangle = { 0, 0, width, height };
  AdjustWindowRect(&windowRectangle, WS_OVERLAPPEDWINDOW, FALSE);

  hwnd = CreateWindowEx(NULL, WINDOW_CLASS_NAME, WINDOW_TITLE, DEFAULT_WINDOW_STYLE,
    CW_USEDEFAULT, CW_USEDEFAULT, windowRectangle.right, windowRectangle.bottom, NULL, NULL, instance, NULL);

  if (!hwnd)
  {
    exit(1);
  }
}
The CreateWindowEx() function requires couple of arguments.
- Extended Window Style – extended flags for window style, not important in our case since we need the simplest window possible
- Window Class Name – name of the previously register window class we want to associate this window with
- Window Title – a title that will show up on the window bar, we set it once and it will never change during the program’s lifetime
- Window Style – window parameters, like is the window visible from the start, does it have a tiny border around it, does it have a window bar or a system menu
- Starting Window Position – we can use CW_USEDEFAULT, which will make it appear every time in a slightly different position
- Window Dimensions – with and height of the window, corrected so we have the client area at the same dimensions as the game resolution
- Window Handle – this is a handle to a parent window, we are the parent window, so we need to set this to NULL
- Window Menu – since we don’t have a menu, set to NULL
- Window Instance – handle to a module that will be associated with the window, we have this value already obtained in the constructor
- Passed Value – not important in our case
One of the parameter is the required window size. This is however the entire window size, not just the client area – it includes the top window bar. Unfortunately, down the road, this would make our scene appear a little squeezed, so we need to correct this window size to apply only to the client area. To do that, we need to call AdjustWindowRect() function with the RECT structure filled with requested window dimensions. The function will simply add the size of the window bar, so when we can pass them to the create window function it will effectively only apply to window’s client area.
The most important thing is the return value – a window handle to a created window. The Windows resources that we use in our application, like the window, is an actual object in the memory. It is however govern by the operating system, meaning you cannot modify them directly. Instead, you can obtain a handle to that object, which you can then use to modify the object via other API functions.
Each handle has an entry in an internal table, which translates into the address of the resources. So it kind of works as a pointer to a data associated with that window, although you can’t directly modify the data that this points to. We need to store window handle, because we will need that later in order to create some DirectX resources.
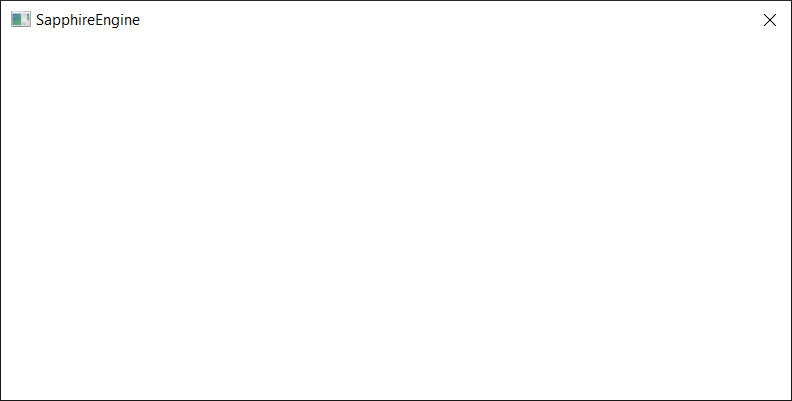
And this is it – we have our window created. If you would like to run the application now though, you would see that the window shows up for a second and then disappear. That’s because it is missing one last key component that will handle the actual window behavior.
Message Loop
Finally it is time to implement a window behavior – a message loop, where we will be peeking at the queue and handling messages, but also calling our Tick() function which is the heart of our game loop.
void WindowApplication::Run()
{
  Initialize();

  MSG msg{ 0 };
  while (1)
  {
    bool isMessageAvailable =
      PeekMessage(&msg, NULL, 0, 0, PM_REMOVE);

    if (isMessageAvailable)
    {
      if (msg.message == WM_QUIT)
      {
        break;
      }
      DispatchMessage(&msg);
    }

    Tick();
  }
}
First and foremost – this is an infinite loop. The only way to exit it is to close the associated window, either by clicking the “x” button in the top-right corner, or by pushing “Alt+F4” on the keyboard. This would trigger the WM_DESTROY message to be placed on the message queue, which will be handled in Window Procedure and eventually the WM_QUIT message will be placed on the queue and received by PeekMessage() function.
You might remember that we’re not handling this message in window procedure. To understand why, you need to understand that OS creates message queue for each thread that creates window and this queue holds messages for all windows that are created on that thread. This message is not associated with any window, its window handle is set to null, which means it doesn’t really know which window procedure should receive it. Instead, we can detect it via PeekMessage() function and terminate the message loop.
Now, to the PeekMessage() function. There are two functions that let us check message queue, this one and GetMessage(). PeekMessage() looks at the queue and returns immediately indicating if there is a message on the queue. If it is not, then it returns false and we continue. The GetMessage() waits for the message – this is great behavior for normal window application, but for a game we need that loop running. We set the HWND parameter of PeekMessage() to NULL, simply to be able to receive WM_QUIT message. Otherwise it would be filtered out and we wouldn’t be able to process it.
Finally, if message is available, we call a DispatchMessage() function, which simply forwards the receive message to associated window procedure.
There is one more thing that we do every iteration, no matter if there are any messages on the queue – calling the virtual function Tick(). This is the function that will be overwritten in the engine and in it we will handle all the necessary steps to produce a frame for GPU.
Engine Class
Now to the final element of the puzzle. The Engine class will inherit from WindowApplication class. It will overwrite the Initialize() and Tick() function, and on instance of that class we will call the Run() method, effectively starting our game.
#define DEFAULT_WINDOW_WIDTH 1280
#define DEFAULT_WINDOW_HEIGHT 720

class Engine : public WindowApplication
{
  public:
    Engine(UINT width = DEFAULT_WINDOW_WIDTH, UINT height = DEFAULT_WINDOW_HEIGHT);
    ~Engine();
  private:
    void Initialize() override;
    void Tick() override;
};
The class will have a default constructor, simply to let the end user write some code a little faster if he doesn’t care too much about the resolution.
| A default constructor is the one that can be called without arguments. If the programmer wouldn’t provide any constructor for its class, the compiler will implicitly do it behind the scenes. The programmer can explicitly create the default constructor by creating one without any arguments or with each argument having a default value defined, which is what we did with Engine. |
Finally, here’s how we will be starting the game.
int main()
{
  Sapphire::Engine engine;
  engine.Run();
}
Thanks to the power of polymorphism, in the game loop the overridden function will be run and we will be able to use that to decouple the engine implementation from the windows application implementation.
Performance
In this course we will be looking at the performance of the application every step of the way. The simplest tool that could show some basic performance metrics is actually the Task Manager.
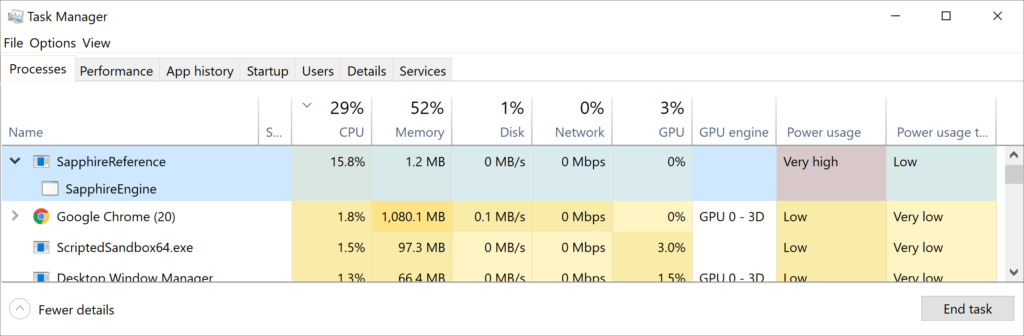
This is something that you might find interesting – even though the application doesn’t do much, it really seems to go hard on the processor. Almost 16% of the CPU time is spent on our application. If you think about it, we run an infinite loop with no constraints. Every frame we are calling some API functions and checking message queue. Even though this is not very intense task, we have no constraints or what so ever – depending on the hardware, we might be executing this simple code thousands of times per-second, which would explain high CPU usage. We could have avoided that with GetMessage() function, but we don’t want to wait for messages when the engine is running.
We have not yet sent any commands to the GPU, therefor there is no GPU usage. The memory usage is really low – only 1.2 MB. We don’t store that much data yet.
Summary
We have created the WindowApplication class that will encapsulate all the necessary steps to create a window and the window behavior. We have created and registered window class, implemented window procedure and created a window. We’ve also created an infinite message loop that will call our Tick() method every iteration.
We handle messages necessary to terminate the application – a WM_DESTROY to post WM_QUIT on the queue, and WM_QUIT to stop the message loop and exit. We’ve added a convenient way to check for COM errors.
Finally, we’ve created the Engine class that will overwrite the Tick() and Initialize() methods and therefore decouple the engine functionality from window related functionality. If you now run the application, you will be able to see our window. You can drag it around and close it, which is exactly what we want.
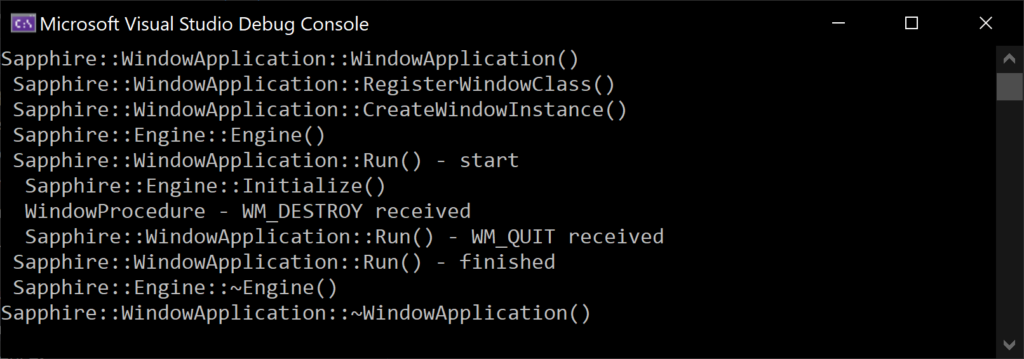
Besides of the window being showed, we also have created some logs that were presented on the console.
Game engine at its core is really a piece of software that processes a lot of data in order to produce 2D images with some decent frequency. For movies it is usually 25 frames per second, but for games the very minimum is 30 FPS and 60 FPS is considered good. There are many types of data that engine processes, things like geometry, various textures, scripts and such. Therefore, it is really important to keep track of our data. Let’s just quickly have a look at the memory layout and what we have where.

At the moment, we really don’t have much data – only window handle, window instance, requested width and requested height, which we will need later when creating DirectX resources. This data is being constructed along with WindowApplication class and is being kept on the stack over the entire lifetime of the application.
In the next chapter we will try to get rid of the console and figure out better logging mechanism.
Source code for this part of the course can be found under chapter “CH01” in this repository here: https://github.com/bboczula/GameEngineCourse.git